Managing access to API
As an administrator, you manage access of end users to installed services. In the API Keys service web interface, the following entities are available:
- Partner - the end user who works with services installed inside the On-Premise system (for example, map APIs). You can add partners to the system and edit their data.
- Subscription - a set of services available to the partner, along with usage restrictions. You can create, edit, and block subscriptions.
- API key - a key that the end user (partner) uses to access the available service. The key inherits the set of services and restrictions from the subscription. You can create API keys within a subscription, edit API key data, edit the list of available services, set additional key restrictions, and block the key.
Getting started
To start using the API keys management web interface, follow the steps below:
- Make sure that the API Keys service is installed, works properly, and an administrator is added to the service using the
keysctlutility. For details, see the Installing API Keys service instruction. - Go to a link in the
https://keys-admin.example.com/format that you received after installing the API Keys service. - Log in to the web interface using the administrator credentials.
The administrator interface contains two tabs:
-
Partners
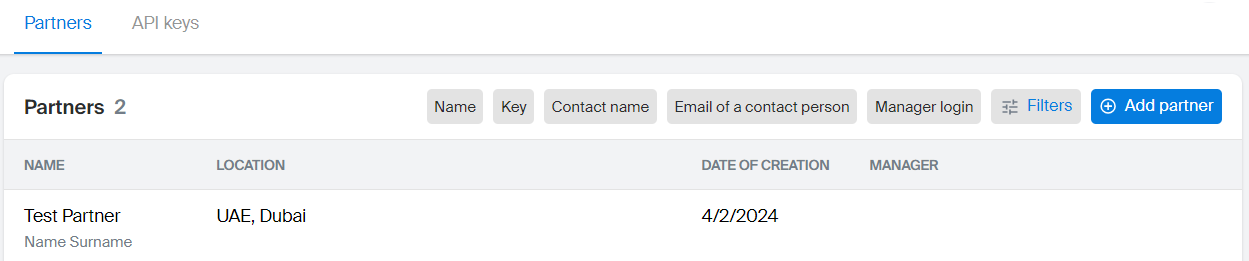
Here you can:
- Add new partners.
- View and filter the list of partners by name, key, contact person data, manager login (an administrator who added the partner), and other parameters.
- Export the list of all partners in
.xlsxformat by clicking Download partners.xlsx in the upper-right corner of the interface. The downloaded file contains all existing partners, and filters are not applied.
-
API keys
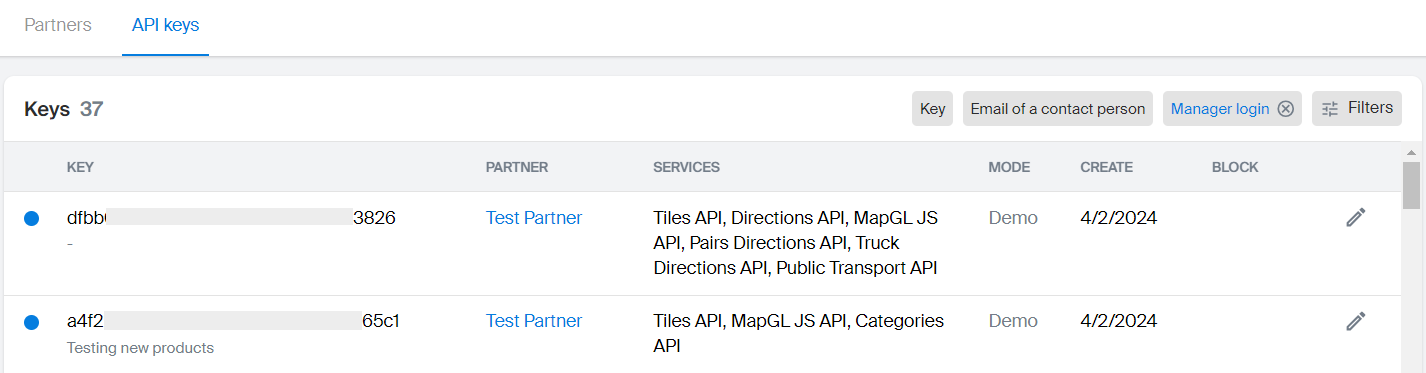
Here you can:
- View and filter the list of keys for all partners by key number, contact person email, manager login (an administrator who added the partner), and other parameters.
- Export the list of all keys in
.xlsxformat by clicking Download keys.xlsx in the upper-right corner of the interface. The downloaded file contains all existing keys, and filters are not applied.
Partners
Adding a partner
-
Go to the Partners tab and click Add partner.
-
Fill in the partner information:
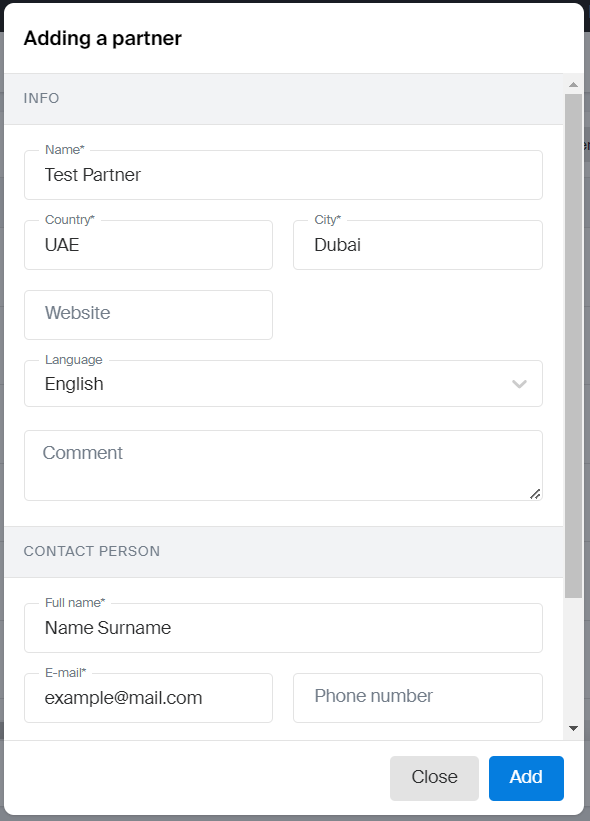
- Name: account name displayed in the administrator interface.
- Country: country of partner residence.
- City: city of partner residence.
- Language (optional parameter): language for communication with the partner.
- Contact person: information about the partner contact person: full name and email. By default, the information is used for all partner keys unless alternative data is specified during API key creation.
-
Click Add.
-
Proceed with creating a subscription for the partner.
Editing partner data
- Go to the Partners tab and select the card of the required partner.
- Click
 icon next to the partner name.
 - Apply necessary changes and click Save.
Subscriptions
To allow a partner to work with APIs, create a subscription that defines the available set of services and usage limits. API keys are created within a subscription and used by the partner to access services. If a subscription is inactive (for example, expired), its API keys also stop working.
Creating a subscription
-
Go to the Partners tab and select the required partner card.
-
Open the Subscriptions panel.
-
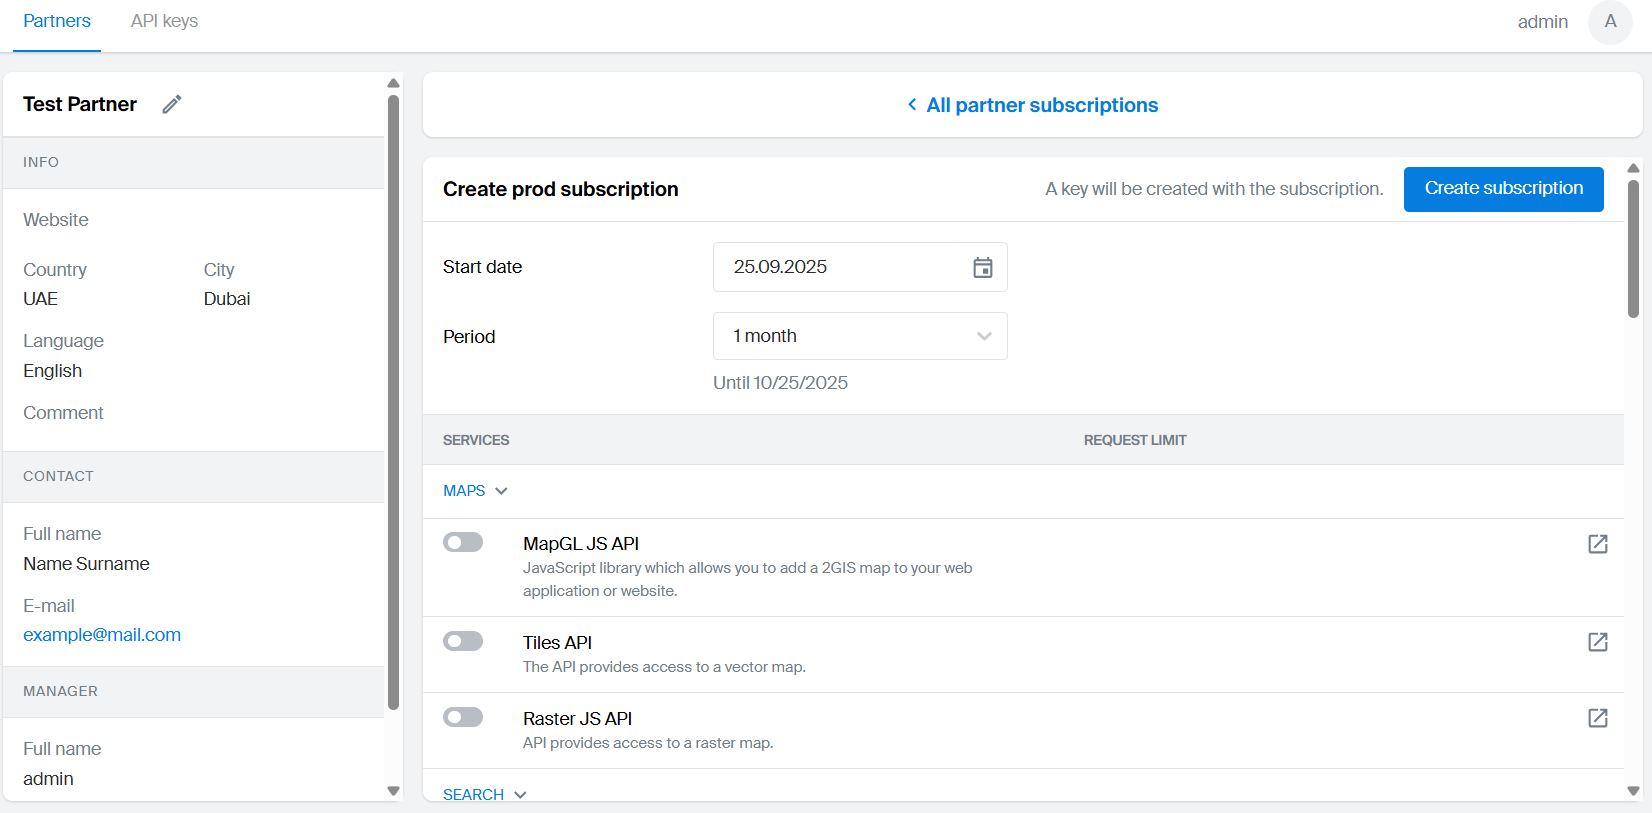
Create a subscription:
- Click Create demo subscription to create a subscription for trial use with pre-configured service restrictions.
- Click Create prod subscription to create a subscription for full operation.
A partner can have only one active subscription of each type at a time.
-
Specify the subscription start date.
-
Select the subscription period.
-
Select the services to include in the subscription:
-
Use the toggle on the left to add or remove a service from the subscription.
-
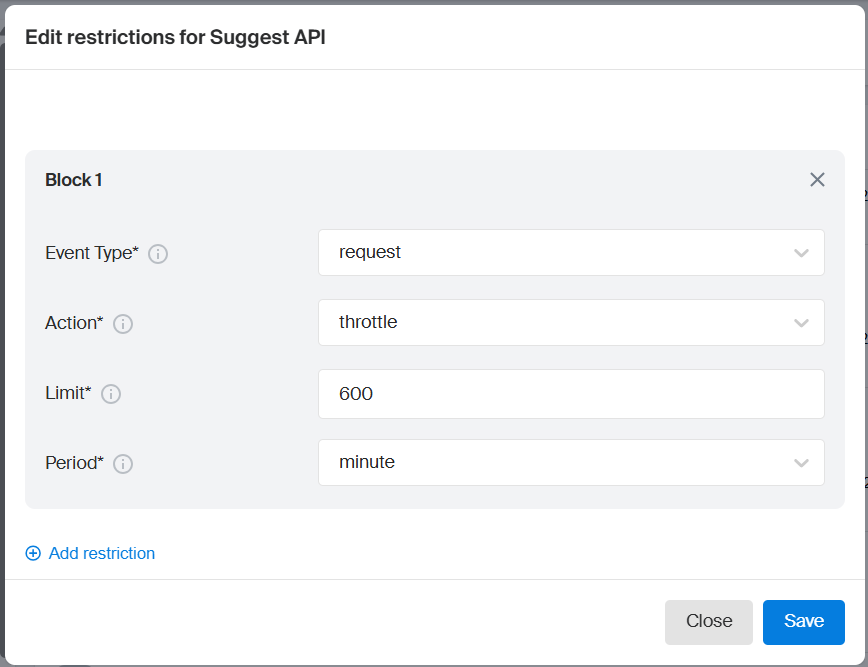
Review the default service usage restrictions. If needed, you can change or remove them, or create multiple restrictions. Each restriction is defined by the following parameters:
- Event type: the entity type the restriction applies to: requests or objects returned in the response.
- Action: the event triggered when the limit is reached: email notification, throttling, or access blocking. The event remains active until the next subscription period starts.
- Limit: usage limit for the entities specified in Event type. Limits reset at the start of the next subscription period.
- Period: the time interval for limit tracking: minute, day, or month.
-
Click Save.
-
-
Click Create subscription.
-
Proceed to creating an API key.
If the partner did not previously have a subscription of the selected type (demo or prod), the first API key is created automatically.
Editing a subscription
You can edit the duration of a subscription, included services, and their usage restrictions.
To change the subscription duration:
-
Go to the Partners tab and select the required partner card.
-
On the Subscriptions panel, select the required subscription.
-
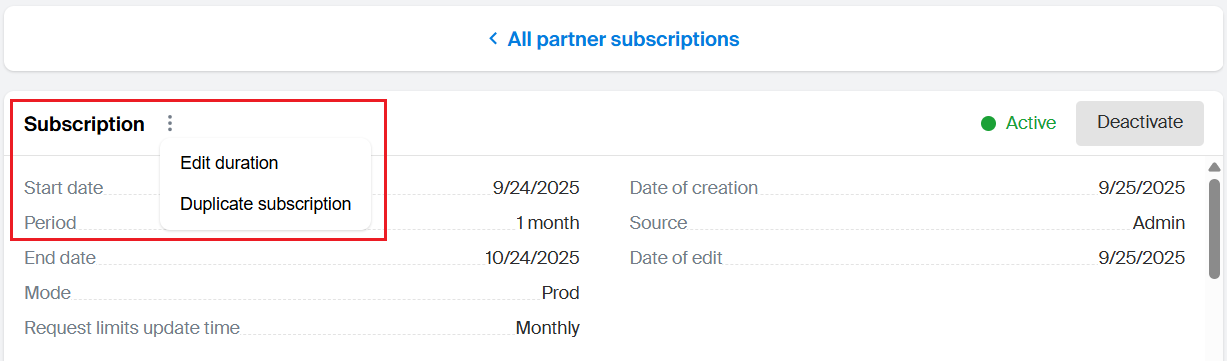
Click the
 icon next to the subscription name and select Edit duration.
 -
Specify the new start date or period.
-
Click Save.
To change the set of services in the subscription and their usage restrictions:
-
Go to the Partners tab and select the required partner card.
-
On the Subscriptions panel, select the required subscription.
-
To add or remove a service from the subscription, use the toggle to the left of the service name.
To change service usage restrictions, click the
 icon.
icon.Important
Changes to the list of services will affect all active API keys. For example, if you add a service to a subscription, all API keys will have access to it by default. To restrict access to a service for specific keys, edit the list of services for the relevant key.
Blocking a subscription
When a subscription is blocked, all related API keys stop working and the subscription status changes to Inactive.
- Go to the Partners tab and select the required partner card.
- On the Subscriptions panel, select the required subscription.
- Click Deactivate in the upper-right corner of the panel.
- To unblock, click Activate.
API keys
API keys requires an active subscription to work. Within a single subscription, you can create multiple keys with different sets of services and restrictions.
Creating an API key
-
Go to the Partners tab and select the card of the required partner.
-
Create a key depending on the type of the active subscription:
- Click Create demo key to create an API key within a demo subscription.
- Click Create prod key to create an API key within a prod subscription.
-
Fill in the key information:
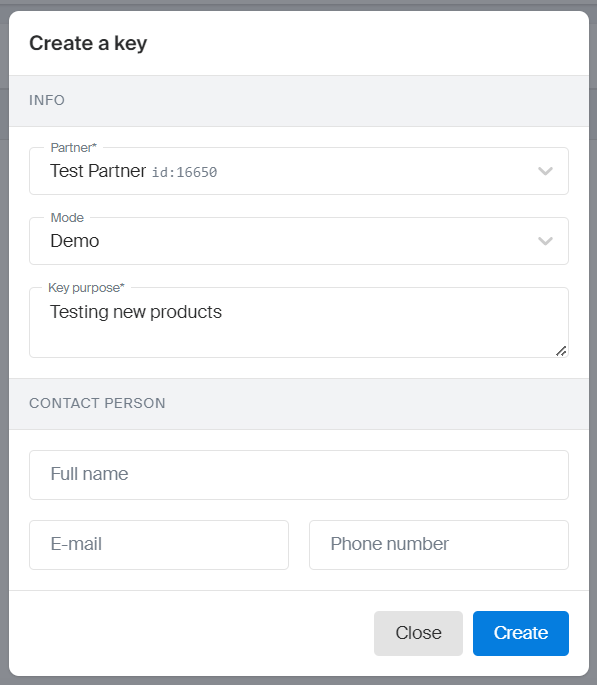
- Partner: partner for whom the key is created (by default, the current partner is selected).
- Key purpose: description of the key purpose.
- Contact person (optional parameter): information about the contact person for the key. If left empty, the partner contact data is used.
-
Click Create.
The created key provides access to all services included in the active subscription of the corresponding type, according to the configured restrictions.
Editing API key data
- Select the required key on the API keys tab or in the partner card on the Partners tab.
- To edit the key description, the contact person, or assign the key to a different partner, click icon next to the key ID. Apply necessary changes and click Save.
- To change the key operating mode (Demo/Prod), select it in the Mode block. The partner must have an active subscription of the corresponding type.
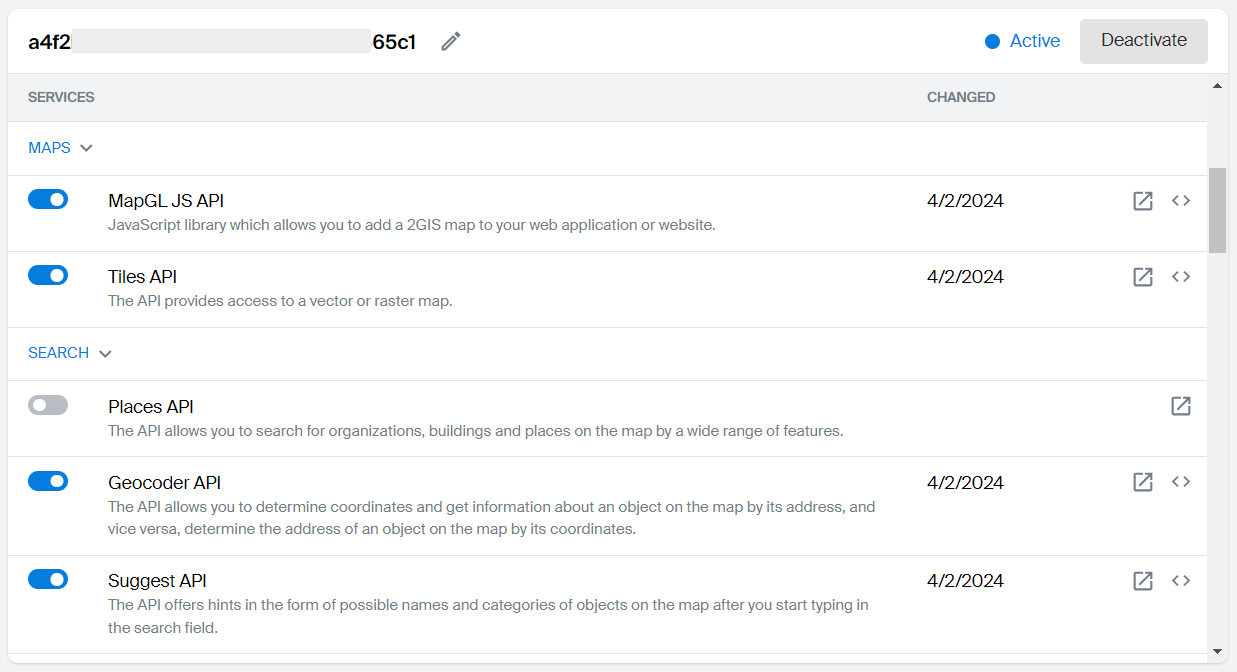
Editing a list of services in a key
You can edit a list of services that the partner can access using the key.
Note
You can only manage access to services included in the active subscription. To change the list of available services, edit the subscription.
-
Select the required key on the API keys tab or in the partner card on the Partners tab.
-
Scroll down the key page to see the list of available services.
-
To grant or revoke access to the service, use the toggle next to the service name.
To change service usage restrictions, click the
icon.
Additional API key restrictions
Important
Restrictions are applied to all services specified for the API key.
-
Select the required key on the API keys tab or in the partner card on the Partners tab.
-
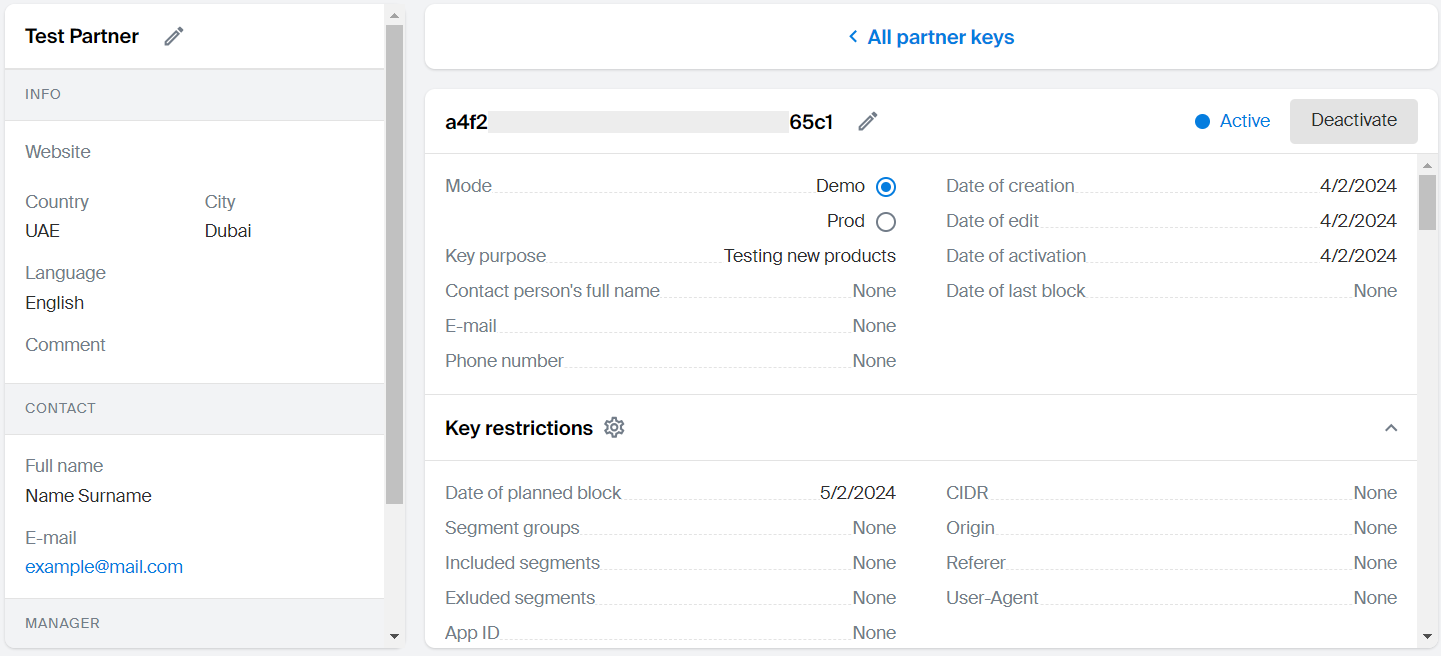
In the Key restrictions section, click
icon. -
Configure the key restrictions:

-
Deactivation time: key deactivation date.
-
By territory: access restriction by territory.
- Segment groups: list of available geographical segments (territories).
- Included segments: additional list of available segments outside the selected groups.
- Excluded segments: list of segments from the selected groups that are not accessible.
-
By application: access restriction by mobile application ID.
-
By IP or subnets: access restriction by IP addresses.
-
By HTTP headers: access restriction by header values.
-
-
Click Save.
Deactivation time
Allows you to set the date and time for key deactivation, after which the key becomes inactive, and all requests using the key are rejected.
Usage example: set the key validity period until December 31, 2025.
Steps:
- In the Deactivation time field, enter the date
31.12.2025. The time12:00:00in the GMT (UTC+3) timezone is set automatically. - Click Save.
Result: the key is active only until 31.12.2025 12:00:00 GMT.
By territory (Segment groups)
Allows access to groups of geographic segments (territories). The key will work only for segments from the specified groups (e.g., UAE), including all regions and cities within those groups.
Usage example: allow access only for users from the UAE.
Steps:
- In the Segment groups field, select
UAEfrom the dropdown list. - Click Save.
Result: the key works for all segments in the United Arab Emirates. Requests from other countries (e.g., Saudi Arabia) are rejected.
By territory (Included segments)
Allows access to segments that are not part of the selected groups, or if no groups are specified. For example, you can select one country as a group and additionally include a segment with one city from another country. Segments already included in the selected groups cannot be added.
Usage example: allow access only for requests from Dubai.
Steps:
- Leave the Segment groups field empty.
- In the Included segments field, select
Dubai. - Click Save.
Result: the key works only for requests from Dubai. Requests from other segments (e.g., Abu Dhabi) are rejected.
By territory (Excluded segments)
Restricts access to segments within the selected groups. For example, you can select the entire territory of the country and restrict access to a specific segment within it.
Usage example: allow access for requests across all the UAE except Dubai.
Steps:
- In the Segment groups field, select
UAE. - In the Excluded segments field, select
Dubai. - Click Save.
Result: the key works for requests from all segments in the UAE except Dubai. For example, requests from Abu Dhabi are allowed.
By application
Restricts access based on the mobile application identifier (appId).
Usage example: allow access only for requests from the application with the identifier com.dgis.sdk.app.
Steps:
- In the App ID field, enter
com.dgis.sdk.app. - Click Save.
Result: the key works only for requests from the application with the identifier com.dgis.sdk.app. Requests from other applications (e.g., com.dgis.test.app) are rejected.
By IP or subnets
Restricts access based on a list of IP addresses or subnets in CIDR format (e.g., 192.168.1.0/24). The restriction uses the client IP address extracted from the following headers:
Remote-Addr: IP address of the TCP connection source or the proxy server IP address when using a proxy or NAT.X-Forwarded-For: chain of IP addresses, where the first address is the client IP. It is recommended to use this header, as it supports complex network configurations with proxy.X-Real-IP: client IP address passed by the proxy.
Usage example: allow access only for requests from the corporate subnet 192.168.1.0/24.
Steps:
-
In the CIDR field, enter the subnet
192.168.1.0/24. -
Click Save.
-
If you use a proxy or NAT, headers may be missing or contain incorrect client IP addresses, which can disrupt the restriction. Make sure that your infrastructure (proxy, load balancers, NAT, Ingress) passes headers with the original client IP address:
- Check the configuration of the Nginx Ingress controller in your Kubernetes cluster (e.g., the
values.yamlfile in the Helm chart). - Check the configuration of the proxy or the load balancer (e.g., the
proxy_set_headerdirective in Nginx). - Enable logging of HTTP headers (
Remote-Addr,X-Forwarded-For,X-Real-IP) in the API Keys service. - Use traffic analysis tools to confirm that at least one header contains the correct client IP address (e.g., Wireshark, tcpdump).
- Check the configuration of the Nginx Ingress controller in your Kubernetes cluster (e.g., the
Result: the key works only for requests from IP addresses in the range 192.168.1.0 — 192.168.1.255, provided that one of the headers (Remote-Addr, X-Forwarded-For, X-Real-IP) correctly passes the client IP address. Requests from other IP addresses (e.g., 10.0.0.1) or without valid headers are rejected.
If necessary, you can contact the technical support for configuration clarification or recommendations.
By HTTP headers
Restricts access based on HTTP headers in the request:
Origin: by server name.Referer: by page URL.User-Agent: by application type, operating system, and other parameters.
Usage example: allow access only for requests from the domain example.com and from a browser with User-Agent Mozilla/5.0 setting.
Steps:
- In the Origin field, enter
example.com. - In the User-Agent field, enter
Mozilla/5.0. - Click Save.
Result: the key works only for requests with the headers Origin: example.com and User-Agent: Mozilla/5.0. Requests from other domains (e.g., test.com) or other clients (e.g., curl/7.0) are rejected.
Deactivating an API key
Deactivating a key blocks access to all its services and changes status to Inactive.
- Select the required key on the API keys tab or in the partner card on the Partners tab.
- Click Deactivate next to the key ID.
- To unblock the key, click Activate.