Installing the API Platform
To install the API Platform:
- Prepare for installation
- Install License service
- Install API Keys service
- Install Statistics Collection service
- Install Traffic API Proxy
- Install maps API
- Install search API
- Install navigation API
- Install Platform Manager
- Install mobile SDK
During a real installation, it is recommended to use more complex and reliable passwords.
1. Preparation for installation
1.1. Prepare network infrastructure
The recommended infrastructure for running On-Premise services includes a public network and a private network. The table below describes an example of such an infrastructure with the example.com and example.local domains. All the components must be deployed in a single Kubernetes cluster managed from the example.com host.
| Infrastructure component | Who must have access | Network type | Domains used in the documentation |
|---|---|---|---|
| Artifacts delivery infrastructure | The infrastructure administrator | Public | example.com example-external.comexample-internal.com |
| Docker Registry for storing service images | DGCLI utility from the example.com host | Public | docker.registry.example.com |
| Installation Artifacts Storage | DGCLI utility from the example.com host | Public | artifacts.example.com |
| Services' frontends | Applications and end users in the private network | Private | *.example.com |
| Services' backends | Other services and storages from all pods in the Kubernetes cluster | Private | *.example.local |
| Data storages | Other services and storages from all pods in the Kubernetes cluster | Private | *.storage.example.local |
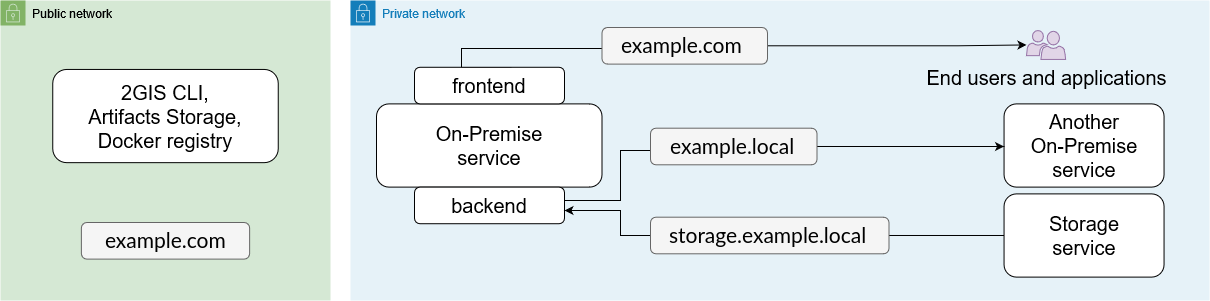
If you use Managed Kubernetes (Kubernetes as a Service) to deploy the product, make sure that access to the Docker registry is configured using the HTTPS protocol and a certificate signed by a trusted certification authority (for example, Let’s Encrypt).
1.2. Add Helm repository
A Helm chart from the On-Premise repository is used to install each product. You need to add this repository on the host from which the installation will be run. In the example described above, it is the example.com host.
-
Install the Helm package manager into the cluster. To do so, follow the official installation instructions.
-
Add the repository containing the Helm charts.
helm repo add 2gis-on-premise https://2gis.github.io/on-premise-helm-charts
helm repo update -
Check that Helm and the repository are installed correctly by running:
helm search repo 2gis-on-premiseIf the command output contains a non-empty list of charts, everything is set up correctly.
If you install services in a private network without internet access, make sure that you have access to the Urbi Helm charts. For example, you can pre-download them.
1.3. Fetch installation artifacts
Configure hosts
Example of On-Premise hosts architecture:

docker.registry.example.com
This host will serve the Docker Registry. The host must be available in the public network, see Preparation for installation.
To configure the host:
-
Install an operating system.
-
Install Docker Registry.
The registry must be available at
https://docker.registry.example.com/.The Kubernetes cluster must trust this registry and be able to download images from it. To do this, the registry must be configured with a valid HTTPS certificate.
-
Configure authentication in the registry by username and password.
Example:
- Username:
registry - Password:
DOCKERregistryP@ssW0rd
- Username:
artifacts.example.com
This host will serve the S3 compatible installation artifacts storage. The host must be available in the public network, see Preparation for installation.
To configure the host:
-
Install an operating system.
-
Install an S3 compatible storage that fits your needs. It is recommended to use Ceph.
The storage must be available at
https://artifacts.example.com/. -
In the installed storage, create the
onpremise-artifactsbucket of the needed size. -
Set a service account with read and write permissions to the bucket.
Generate a key for this account, which will be used to access the bucket.
Example:
- Access key:
AKIAIOSFODNN7EXAMPLE - Secret key:
wJalrXUtnFEMIK7MDENGbPxRfiCYEXAMPLEKEY
- Access key:
example.com
This host will serve the DGCLI utility. The host must be available in the public network, see Preparation for installation.
To configure the host:
-
Install an operating system.
-
Install Docker Engine.
-
Ensure that the previously configured services are available:
https://docker.registry.example.com/https://artifacts.example.com/
After that, you can download the installation artifacts using one host.
If a single host cannot provide simultaneous access to the public network, Docker registry, and S3 compatible storage, configure two hosts:
example-external.comwith access to the public network;example-internal.comwith access tohttps://docker.registry.example.com/andhttps://artifacts.example.com/.
After that, you can download the installation artifacts using two hosts.
Download installation artifacts
The process can be launched on one host that has both Docker registry, S3, and internet access, or on two separate hosts with different access settings. Perform the following steps depending on the selected host configuration.
For downloading installation artifacts, DGCLI utility is used. Before running the utility, ensure your user has permission to run Docker without using sudo. Otherwise, download errors will occur.
- Using one host
- Using two hosts with different access options
-
Log in to
example.comvia SSH. -
Create the
dgctl-config.yamlconfiguration file. In thecomponentssection, specify the versions of all components included in your build. For a detailed description of the available parameters, see the DGCLI configuration file description.dgctl-config.yamlkey: DEMO-KEY-DGCTL-AAAAAA-BBBBBB
log-format: json
storage:
type: s3
host: artifacts.example.com
bucket: onpremise-artifacts
access-key: AKIAIOSFODNN7EXAMPLE
secret-key: wJalrXUtnFEMIK7MDENGbPxRfiCYEXAMPLEKEY
docker:
registry:
username: registry
password: DOCKERregistryP@ssW0rd
server-address: https://docker.registry.example.com
image-prefix: /
# For utility version 3
components:
core:
version: <core-version>
api-platform:
version: <api-platform-version> -
Download installation artifacts to the file system using the DGCLI utility:
docker run --rm \
   -v $(pwd)/dgctl-config.yaml:/dgctl-config.yaml \
   -v /var/run/docker.sock:/var/run/docker.sock \
   -v $(pwd)/values:/values \
   --user $(id -u):$(id -g) \
   2gis/dgctl:3 \
   pull --config=/dgctl-config.yaml --apps-to-registry --generate-values
Fetching artifacts may take a long time. When the process is complete, the command output will include the path to the manifest files for all components. Example:
manifests/<component>/1640661259.json.If you use the
--generate-valuesflag, thegeneral.yamlfile with configuration parameters is generated and stored in the local directory specified in the-v <path>:/values/<component>/argument (-v $(pwd)/values:/valuesin the example). If the path is not specified, the file is deleted after running the utility.Features of DGCLI versionsIf you are using:
- DGCLI utility version 2, additionally specify the
--versionparameter with the required On-Premise software suite version - DGCLI utility version 3.6 or later, the
-v /var/run/docker.sock:/var/run/docker.sockargument is not required
For details, see DGCLI command-line arguments reference.
- DGCLI utility version 2, additionally specify the
When using two hosts, you need to download installation artifacts from the update servers and transfer them to an S3 compatible storage. You can use the DGCLI utility (recommended) or another S3 client for this purpose.
-
Connect to the
example-external.comhost via SSH. -
Create a directory to fetch the installation artifacts. You can save its path in the
COPY_DIRenvironment variable. For example:COPY_DIR=/mnt/dgctl-source -
Create a
dgctl-config.yamlconfiguration file. In thecomponentssection, specify the versions of all components in your build. For a detailed description of the available parameters, see the DGCLI configuration file description.dgctl-config.yamlkey: DEMO-KEY-DGCTL-AAAAAA-BBBBBB
log-format: json
storage:
type: fs
directory: /data
# For utility version 3
components:
core:
version: <core-version>
api-platform:
version: <api-platform-version> -
Download installation artifacts to the file system using the DGCLI utility:
docker run --rm \
   -v $(pwd)/dgctl-config.yaml:/dgctl-config.yaml \
   -v $COPY_DIR:/data \
   -v $(pwd)/values:/values \
   --user $(id -u):$(id -g) \
   2gis/dgctl:3 \
   pull --config=/dgctl-config.yaml --generate-values
Fetching artifacts may take a long time. Once the process is complete, the command output will include the path to the manifest files for all components. Example:
manifests/<component>/1640661259.json.If you use the
--generate-valuesflag, thegeneral.yamlfiles with configuration parameters are generated for each component and stored in the local directory specified in the-v <path>:/values/<component>/argument (-v $(pwd)/values:/valuesin the example). If the path is not specified, the files are deleted after running the utility.Using DGCLI version 2If you are using DGCLI utility version 2, additionally specify the
--versionparameter with the required On-Premise software suite version. For details, see DGCLI command-line arguments reference. -
Transfer the
COPY_DIRdirectory fromexample-external.comtoexample-internal.com. -
Connect to the
example-internal.comhost via SSH. -
Create a
dgctl-config.yamlconfiguration file. In thecomponentssection, specify the versions of all components in your build. For a detailed description of the available parameters, see the DGCLI configuration file description.dgctl-config.yamlkey: DEMO-KEY-DGCTL-AAAAAA-BBBBBB
log-format: json
storage:
type: s3
host: artifacts.example.com
bucket: onpremise-artifacts
access-key: AKIAIOSFODNN7EXAMPLE
secret-key: wJalrXUtnFEMIK7MDENGbPxRfiCYEXAMPLEKEY
docker:
registry:
username: registry-user
password: DOCKERregistryP@ssW0rd
server-address: https://docker.registry.example.com
image-prefix: /
# For utility version 3
components:
core:
version: <core-version>
api-platform:
version: <api-platform-version> -
Transfer the data from the
COPY_DIRdirectory to the Docker registry and storage using the DGCLI utility:docker run --rm \
-v $(pwd)/dgctl-config.yaml:/dgctl-config.yaml \
-v $COPY_DIR:/dgctl-source \
-v /var/run/docker.sock:/var/run/docker.sock \
--user $(id -u):$(id -g) \
2gis/dgctl:3 \
restore --config=/dgctl-config.yaml --from-dir=/dgctl-source --apps-to-registryUsing utility version 3.6 or laterIf you are using DGCLI utility version 3.6 or later, the
-v /var/run/docker.sock:/var/run/docker.sockargument is not required.
Create a Kubernetes secret for accessing Docker Registry
This secret is required so that Helm, which is used for installing On-Premise services, can access the Docker images located in the Registry. Without a secret, any operation involving the Registry will fail.
Example:
kubectl create secret docker-registry onpremise-registry-creds \
    --docker-server=docker.registry.example.com \
    --docker-username=registry \
    --docker-password=DOCKERregistryP@ssW0rd
2. Installing License service
2.1. Before installing
-
Consider getting familiar with:
- On-Premise software suite architecture
- System requirements for software and computational resources
-
Make sure the necessary preparation steps are completed.
-
Collect data specified or retrieved on previous steps:
Object Example value How to get value Urbi License key DEMO-KEY-DGCTL-AAAAAA-BBBBBBSee Preparation for installation Endpoint of the S3 compatible Installation Artifacts Storage artifacts.example.comSee Fetching installation artifacts Installation Artifacts delivery infrastructure example.com
example-external.com
example-internal.comSee Fetching installation artifacts Installation Artifacts Storage bucket name onpremise-artifactsSee Fetching installation artifacts Installation Artifacts Storage access key AKIAIOSFODNN7EXAMPLESee Fetching installation artifacts Installation Artifacts Storage secret key wJalrXUtnFEMIK7MDENGbPxRfiCYEXAMPLEKEYSee Fetching installation artifacts Endpoint of the Docker Registry for storing service images docker.registry.example.comSee Fetching installation artifacts Docker Registry username registrySee Fetching installation artifacts Docker Registry password DOCKERregistryP@ssW0rdSee Fetching installation artifacts -
Make sure that the resource requirements specified in the Helm chart are met. For more information on how to do this, see the System requirements document.
Contents of the Helm chart described in this chapter are relevant for the latest version of core services (see Core services releases). To find parameters for previous versions, open values.yaml on GitHub and select a Core-<version> tag in the tag switcher on the left.
2.2. Install License service
-
Create a Helm configuration file. See here for more details on the available settings. The example is prefilled with the necessary data collected on previous steps.
values-license.yamldgctlDockerRegistry: docker.registry.example.com
imagePullSecrets: [onpremise-registry-creds]
dgctlStorage:
host: artifacts.example.com
secure: true
bucket: onpremise-artifacts
accessKey: AKIAIOSFODNN7EXAMPLE
secretKey: wJalrXUtnFEMIK7MDENGbPxRfiCYEXAMPLEKEY
region: ''
license:
type: ''
retryPeriod: 30s
softBlockPeriod: 2w
persistence:
host: artifacts.example.com
secure: true
region: ''
bucket: onpremise-artifacts
root: 'license_state'
accessKey: AKIAIOSFODNN7EXAMPLE
secretKey: wJalrXUtnFEMIK7MDENGbPxRfiCYEXAMPLEKEY
tpm:
mountTPMDevice: false
pvcBind:
enable: false
storageClassName: ''
customCAs:
bundle: ''
# bundle: |
# -----BEGIN CERTIFICATE-----
# ...
# -----END CERTIFICATE-----
certsPath: ''
affinity: {}Where:
-
dgctlDockerRegistry: endpoint of your Docker Registry with the images of the Urbi On-Premise services in theHOST:PORTformat. -
imagePullSecrets: Kubernetes Secrets to access the Docker Registry with the images of the Urbi On-Premise services. -
dgctlStorage: settings for access to the installation artifacts storage.host: endpoint of the S3 compatible installation artifacts storage in theHOST:PORTformat.secure: whether to use HTTPS for interacting with the S3 compatible storage. Default value:false.bucket: S3 bucket name.accessKey: access key for accessing the S3 bucket.secretKey: secret key for accessing the S3 bucket.region: S3 compatible storage region.
-
license: License service settings.type: license type (not version). Copy the numerical value from thevalues/general.yamlfile, which is generated automatically during the fetching of installation artifacts. Do not change this value manually.retryPeriod: duration how often service should try to fetch license from storage if previous attempts were failing.softBlockPeriod: from what period of time the license expiration notification appears. Additional time unitsdfor days andwfor weeks are supported.
-
persistence: settings for access to the storage of the License service states.-
host: endpoint of the S3 compatible storage in theHOST:PORTformat. -
secure: whether to use HTTPS for interacting with the S3 compatible storage. Default value:false. -
region: S3 compatible storage region. -
bucket: S3 bucket name. -
root: S3 bucket root directory to store state files. -
accessKey: access key for accessing the S3 bucket. -
secretKey: secret key for accessing the S3 bucket.warningIf the specified data is lost, the current license becomes invalid. To get a new license, see the Advanced steps for getting a license.
-
-
tpm: settings to access the Trusted Platform Module (TPM). For license type2only (license.type: 2). License type is the numerical value from thevalues/general.yamlfile, which is generated automatically during the fetching of installation artifacts.-
mountTPMDevice: method of granting access to the TPM:-
true: mount the TPM into a Kubernetes pod. Privileged access to the main container is enabled. -
false: use a device plugin to automatically mount TPM inside a Kubernetes pod. You can use the Urbi plugin or build and install a custom plugin in a Kubernetes cluster.
-
-
pvcBind: create a Persistent Volume Claim (PVC) to link a License service pod to a cluster node.enable: whether to use a PVC. Default value:false.storageClassName: name of a Kubernetes storage class.
-
-
customCAs: custom certificates settings.bundle: text representation of a certificate in the X.509 PEM public-key format.certsPath: bundle mount directory in the container.
-
affinity: affinity settings to link License service pods to specific cluster nodes.
Examples of affinity settings:
-
For all license types except
1(license type is the numerical value from thevalues/general.yamlfile, which is generated automatically during the fetching of installation artifacts), it is recommended to place License service pods on different nodes of the cluster:affinity:
podAntiAffinity:
requiredDuringSchedulingIgnoredDuringExecution:
- topologyKey: kubernetes.io/hostname
labelSelector:
matchExpressions:
- key: app.kubernetes.io/name
operator: In
values:
- '' # value of this parameter depends on your environment settings -
For license type
2, it is recommended to limit the set of cluster nodes that the License service can access:affinity:
nodeAffinity:
requiredDuringSchedulingIgnoredDuringExecution:
nodeSelectorTerms:
- matchExpressions:
- key: kubernetes.io/hostname
operator: In
values:
- node-1 # cluster node name
- node-2 # cluster node name
For the detailed descriptions of affinity rules parameters, see the Kubernetes documentation.
-
-
Deploy the service with Helm using the created
values-license.yamlconfiguration file:helm upgrade --install --version=VERSION --atomic --values ./values-license.yaml license 2gis-on-premise/licenseIn the
--versionparameter, specify the required version of core services. For a list of versions, see the Core services releases section.warningVersions of services within a component must be the same and match the component version.
During the first execution, the command returns an error indicating that the license service pod cannot be launched. This is an expected behavior, proceed with the next steps.
2.3. Get license
If you need a license after renewing the Kubernetes API server certificate, changing the key or license type or in other corner cases, see the Advanced steps for getting a license.
For operations with licenses, the DGCLI utility configuration file is used. For details on the process of obtaining the license, see the utility license mode description.
The process can be launched on one host that has access to both S3 compatible storage and internet or on two separate hosts with different access settings. Take the following steps depending on the selected host configuration.
- Using one host
- Using two hosts with different access options
-
Log in to
example.comvia SSH and create thedgctl-config.yamlconfiguration file. For a detailed description of the available parameters, see the DGCLI configuration file description.dgctl-config.yamlkey: DEMO-KEY-DGCTL-AAAAAA-BBBBBB
log-format: json
storage:
type: s3
host: artifacts.example.com
bucket: onpremise-artifacts
access-key: AKIAIOSFODNN7EXAMPLE
secret-key: wJalrXUtnFEMIK7MDENGbPxRfiCYEXAMPLEKEY
docker:
registry:
username: registry
password: DOCKERregistryP@ssW0rd
server-address: http://docker.registry.example.com
image-prefix: /
# For utility version 3
components:
core:
version: <core-version>
api-platform:
version: <api-platform-version> -
Request a license:
docker run --rm \
  -v $(pwd)/dgctl-config.yaml:/dgctl-config.yaml \
  --user $(id -u):$(id -g) \
  2gis/dgctl:3 \
  license --config=/dgctl-config.yaml
If you are using On-Premise version 1.16.0 or earlier, add the
--with-license-v1argument to the end of the command. -
Deploy the license service with Helm again:
helm upgrade --install --version=VERSION --atomic --values ./values-license.yaml license 2gis-on-premise/licenseIn the
--versionparameter, specify the same version of core services as during the previous command execution.
Before you start, make sure you have configured two hosts:
example-external.comwith access to the public network or only to the following addresses:datagateway.api.2gis.comto get license and manifest filesorigin-disk.2gis.comto get application files and data
example-internal.comwith access to Docker registry and an S3 compatible storage
For details, see the Configuring hosts section.
When using two hosts, you need to copy files from and to an S3 compatible storage. For these operations, you can use the DGCLI utility (recommended) or another S3 client.
-
On both hosts, create a directory for moving files. You can save its path in the
COPY_DIRenvironment variable. For example:COPY_DIR=/mnt/dgctl-source -
Log in to
example-internal.comvia SSH and create thedgctl-config.yamlconfiguration file. For a detailed description of the available parameters, see the DGCLI configuration file description.dgctl-config.yamlkey: DEMO-KEY-DGCTL-AAAAAA-BBBBBB
log-format: json
storage:
type: s3
host: artifacts.example.com
bucket: onpremise-artifacts
access-key: AKIAIOSFODNN7EXAMPLE
secret-key: wJalrXUtnFEMIK7MDENGbPxRfiCYEXAMPLEKEY
docker:
registry:
username: registry
password: DOCKERregistryP@ssW0rd
server-address: https://docker.registry.example.com
image-prefix: /
# For utility version 3
components:
core:
version: <core-version>
api-platform:
version: <api-platform-version> -
Generate the files to request a license on
example-internal.com:-
Check if all necessary files for requesting a license are ready (if you are using the DGCLI utility):
docker run --rm \
  -v $(pwd)/dgctl-config.yaml:/dgctl-config.yaml \
  --user $(id -u):$(id -g) \
  2gis/dgctl:3 \
  license --config=/dgctl-config.yaml --dry-run
If you are using On-Premise version 1.16.0 or earlier, add the
--with-license-v1argument to the end of the command. -
Copy the files for requesting a license from an S3 compatible storage to
COPY_DIR:-
If you are using the DGCLI utility, run the following command:
docker run --rm \
  -v $(pwd)/dgctl-config.yaml:/dgctl-config.yaml \
  -v $COPY_DIR:/data \
  --user $(id -u):$(id -g) \
  2gis/dgctl:3 \
  save --config=/dgctl-config.yaml --to-dir /data --only-license
If you are using On-Premise version 1.16.0 or earlier, add the
--with-license-v1argument to the end of the command. -
If you use a different S3 client, copy all contents of the
license-dirdirectory from an S3 compatible storage toCOPY_DIR.
-
-
-
Copy the
COPY_DIRcontents fromexample-internal.comtoexample-external.com. -
Log in to
example-external.comvia SSH and create thedgctl-config-fs.yamlconfiguration file. For a detailed description of the available parameters, see the DGCLI configuration file description.dgctl-config-fs.yamlkey: DEMO-KEY-DGCTL-AAAAAA-BBBBBB
log-format: json
storage:
type: fs
directory: /data
# For utility version 3
components:
core:
version: <core-version>
api-platform:
version: <api-platform-version> -
Request a license on
example-external.com:docker run --rm \
-v $(pwd)/dgctl-config-fs.yaml:/dgctl-config.yaml \
-v $COPY_DIR:/data \
--user $(id -u):$(id -g) \
2gis/dgctl:3 \
license --config=/dgctl-config.yamlIf you are using On-Premise version 1.16.0 or earlier, add the
--with-license-v1argument to the end of the command. -
Copy the
COPY_DIRcontents fromexample-external.comtoexample-internal.com. -
On
example-internal.com, use thedgctl-config.yamlconfiguration file you created on step 2 or create a new one with the same contents. -
Copy the license file from
COPY_DIRto an S3 compatible storage:-
If you are using the DGCLI utility, run the following command:
docker run --rm \
   -v $(pwd)/dgctl-config.yaml:/dgctl-config.yaml \
   -v $COPY_DIR:/data \
   --user $(id -u):$(id -g) \
   2gis/dgctl:3 \
   restore --config=/dgctl-config.yaml --from-dir /data --only-license
If you are using On-Premise version 1.16.0 or earlier, add the
--with-license-v1argument to the end of the command. -
If you use a different S3 client, copy all contents of the
license-dirdirectory fromCOPY_DIRto an S3 compatible storage.
-
-
Deploy the license service using Helm again:
helm upgrade --install --version=VERSION --atomic --values ./values-license.yaml license 2gis-on-premise/license
In the --version parameter, specify the same version of core services as during the previous command execution.
2.4. Check license status
-
Forward the service port using
kubectl:kubectl port-forward <namespace> license.svc 8080:80 -
Send a request to the
/statusendpoint:curl -v 'http://localhost:8080/status' -H "Accept: application/json" | jq -
Check the response:
-
If the license is active, the response contains the HTTP code
200and information about the license status and expiration date in JSON format.Response example
curl -s 'http://localhost:8080/status' -H "Accept: application/json" | jq
{
   "status": 200,
   "issued-at": "2025-08-21T13:49:26Z",
   "soft-block-at": "2026-01-17T21:00:00Z",
   "hard-block-at": "2026-01-31T21:00:00Z",
   "services": {
   "pro": {
         "status": 200,
         "soft-block-at": "2026-01-17T21:00:00Z",
         "hard-block-at": "2026-01-31T21:00:00Z"
   }
   }
} -
If the license is about to expire or has expired, the response contains the code
402(soft block) or403(hard block).Response example
curl -s 'http://localhost:8080/status' -H "Accept: application/json" | jq
{
   "status": 402,
   "issued-at": "2025-10-16T05:50:46Z",
   "soft-block-at": "2026-01-17T21:00:00Z",
   "hard-block-at": "2026-01-31T21:00:00Z",
   "services": {
   "pro": {
         "status": 402,
         "soft-block-at": "2026-01-17T21:00:00Z",
         "hard-block-at": "2026-01-31T21:00:00Z"
   }
   }
}
-
3. Installing API Keys service
3.1. Before installing
-
Consider getting familiar with:
- API Keys service documentation
- On-Premise software suite architecture
- System requirements for software and computational resources
-
Make sure the necessary preparation steps are completed.
-
Collect data specified or retrieved on previous steps:
Object Example value How to get value Endpoint of the Docker Registry for storing service images docker.registry.example.comSee Fetching installation artifacts Kubernetes secret to access the Docker Registry onpremise-registry-credsSee Fetching installation artifacts Endpoint of the S3 compatible Installation Artifacts Storage artifacts.example.comSee Fetching installation artifacts Bucket name for installation artifacts onpremise-artifactsSee Fetching installation artifacts Installation artifacts access key AKIAIOSFODNN7EXAMPLESee Fetching installation artifacts Installation artifacts secret key wJalrXUtnFEMIK7MDENGbPxRfiCYEXAMPLEKEYSee Fetching installation artifacts Path to the manifest file manifests/core/1640661259.jsonSee Fetching installation artifacts -
Make sure that the resource requirements specified in the Helm chart are met. For more information on how to do this, see the System requirements document.
Storage requirements may vary depending on the configured statistics storage time period. The greater the period, the more storage space is required.
Refer to a relevant chartContents of the Helm chart described in this chapter are relevant for the latest version of core services (see Core services releases). To find parameters for previous versions, open values.yaml on GitHub and select a
Core-<version>tag in the tag switcher on the left. -
Choose the domain names for the services.
Example:
- Administrator web interface:
keys-admin.example.com - API backend:
keys-api.example.com
- Administrator web interface:
3.2. Prepare infrastructure
If you use alternatives from the unified register of Russian programs instead of PostgreSQL, Apache Kafka, and Redis, refer to their official documentation for configuration instructions.
Configure PostgreSQL
-
Place a PostgreSQL cluster with the domain name
keys-postgresql.storage.example.localin the private network. It is assumed that the cluster works on the standard port5432. -
Connect to the cluster as a superuser (usually
postgres). -
Create two database users and set passwords for the users:
create user keys_superuser_rw password 'KEYS_Db_Owner_Password_1234';
create user keys_user_ro password 'KEYS_Db_RO_User_Password_5678'; -
Create a database owned by one of the users:
create database onpremise_keys owner keys_superuser_rw; -
Grant limited permissions to the database for the other user:
\c onpremise_keys

ALTER DEFAULT PRIVILEGES FOR ROLE keys_superuser_rw IN SCHEMA public GRANT SELECT ON TABLES TO keys_user_ro;
ALTER DEFAULT PRIVILEGES FOR ROLE keys_superuser_rw IN SCHEMA public GRANT SELECT ON SEQUENCES TO keys_user_ro;
Configure LDAP
For the servers to be able to authenticate API Keys service administrators, it is recommended to use a LDAP server (e.g., Microsoft Active Directory). This step can be skipped if you cannot deploy a LDAP server and are going to use authentication based on plaintext password in the configuration file.
Place a LDAP server with the domain name keys-ldap.storage.example.local in the private network. It is assumed that the cluster works on the standard port 3268.
-
Collect the LDAP settings:
Setting Example value LDAP service username keys_ldap_userLDAP service password KEYS_LDAP_PaSSw0rd_8901Base relative distinguished name for performing search in the LDAP catalog dc=2gisLDAP filter for identifying entries in the search requests (&(objectClass=user)(sAMAccountName=%s)) -
Add a LDAP user named
admin, which will be granted the admin role in the API Keys service.
Configure Apache Kafka
If you don't plan on using the Statistics Collection service, you can skip this step.
-
Place an Apache Kafka storage with the domain name
keys-kafka.storage.example.localin the private network. It is assumed that the storage works on the standard port9092. -
Create a user to connect to the service. Save their credentials.
Example:
- Username:
kafka - Password:
kafka_password
- Username:
Configure Redis
If you don't plan on using the Statistics Collection service, you can skip this step.
-
Place Redis in the private network.
-
Create a user to connect to the service. Save their credentials.
Example:
- Username:
redisuser - Password:
Redis_Password_6379
- Username:
3.3. Install API Keys service
-
Create a Helm configuration file. See here for more details on the available settings.
The example is prefilled with the necessary data collected on previous steps.
values-keys.yamldgctlDockerRegistry: docker.registry.example.com
dgctlStorage:
host: artifacts.example.com
secure: true
bucket: onpremise-artifacts
accessKey: AKIAIOSFODNN7EXAMPLE
secretKey: wJalrXUtnFEMIK7MDENGbPxRfiCYEXAMPLEKEY
manifest: manifests/core/1640661259.json
region: ''
verifySsl: true
redis:
enabled: false
host: redis.cache.example.local
port: 6379
db: 1
password: Redis_Password_6379
postgres:
ro:
host: keys-postgresql.storage.example.local
port: '5432'
name: onpremise_keys
username: keys_user_ro
password: KEYS_Db_RO_User_Password_5678
rw:
host: keys-postgresql.storage.example.local
port: '5432'
name: onpremise_keys
username: keys_superuser_rw
password: KEYS_Db_Owner_Password_1234
kafka:
bootstrapServers: 'keys-kafka.storage.example.local:9092'
username: kafka
password: kafka_password
securityProtocol: SASL_PLAINTEXT
saslMechanism: SCRAM-SHA-512
stats:
topic: 'stat_master_type.401'
groupId: 'keys-counter'
clientId: 'keys-counter'
counter:
enabled: false
preloader:
refreshTick: 10s
ldap:
host: ldap.keys.example.com
port: 3268
useStartTLS: false
useLDAPS: false
skipServerCertificateVerify: false
serverName: ldap.keys.example.com
clientCertificatePath: /home/user/certificates/cert.crt
clientKeyPath: /home/user/certificates/cert.key
rootCertificateAuthoritiesPath: /home/user/certificates/root.cer
bind:
dn: keys_ldap_user
password: KEYS_LDAP_PaSSw0rd_8901
search:
baseDN: dc=2gis
filter: (&(objectClass=user)(sAMAccountName=%s))
statApi:
enabled: false
url: ''
timeout: 30s
retryCount: 3
tasker:
resources:
requests:
cpu: 10m
memory: 32Mi
limits:
cpu: 100m
memory: 64Mi
delay: 30s
admin:
host: https://keys-admin.example.com
ingress:
enabled: true
className: nginx
hosts:
- host: keys-admin.example.com
paths:
- path: /
pathType: Prefix
tls: []
# - hosts:
# - keys-admin.example.com
# secretName: secret.tls
api:
adminUsers: 'admin:8k7RVCP8m3AABDzD'
oidc:
enabled: true
enableSinglePartnerMode: true
enableExternalProvider: true
url: https://keycloak.example.com/realms/platform
defaultPartner:
id: 1
name: 'Partner'
role: admin
ingress:
enabled: true
className: nginx
hosts:
- host: keys-api.example.com
paths:
- path: /
pathType: Prefix
tls: []
# - hosts:
# - keys-api.example.com
# secretName: secret.tls
customCAs:
bundle: ''
# bundle: |
# -----BEGIN CERTIFICATE-----
# ...
# -----END CERTIFICATE-----
certsPath: ''Where:
-
dgctlDockerRegistry: endpoint of your Docker Registry with the images of the Urbi On-Premise services in theHOST:PORTformat. -
dgctlStorage: settings for access to the installation artifacts storage.host: endpoint of the S3 compatible installation artifacts storage in theHOST:PORTformat.secure: whether to use HTTPS for interacting with the S3 compatible storage. Default value:false.bucket: S3 bucket name.accessKey: access key for accessing the S3 bucket.secretKey: secret key for accessing the S3 bucket.manifest: path to the manifest file in themanifests/core/1640661259.jsonformat. This file contains the description of pieces of data that the service requires to operate. See Installation artifacts lifecycle.region: S3 compatible storage region.verifySsl: whether to enable the SSL certificates validation when connecting todgctlStorage.hostvia HTTPS. Default value:true.
-
redis: access settings for the Redis server:enabled: whether to enable Redis. Default value:false.host: host name or IP address of the server.port: listening port of the server.db: Redis database number.password: Redis user password. If no authentication is required, leave the field empty.
-
postgres: access settings for the PostgreSQL server.The API Keys service serves the data in two modes: read-only (
ro) and read-write (rw). The service uses a single database for each mode, however, users are configured with different set of permissions (see the step 1 for details). Set the settings in these sections as follows:-
Settings that are common for both modes:
host: host name or IP address of the server. You can specify multiple host names or IP addresses separated by comma.port: listening port of the server. You can specify multiple ports separated by comma.name: database name.
-
Credentials of the read-only user (the
rosection). -
Credentials of the read-write user (the
rwsection).
The Helm chart uses Kubernetes Secrets to store the
passwordsettings in theroandrwsections. -
-
kafka: Apache Kafka access settings.-
bootstrapServers: addresses and ports of Apache Kafka brokers separated by commas. Example:HOST1:PORT1,HOST2:PORT2. -
username: username for SASL authentication. -
password: password for SASL authentication. -
securityProtocol: security protocol for the connection. -
saslMechanism: SASL authentication mechanism. -
stats: settings for collecting API key usage statistics.topic: name of the Kafka topic from which the API Keys service will read key usage statistics.groupId: Kafka consumer group ID.clientId: Kafka client ID.
-
-
counter: settings for the API key usage counting service.enabled: whether to enable the service. Default value:false.preloader.refreshTick: period (in seconds) with which the service will refresh the cache with information about limits.
-
ldap: access settings for the LDAP server.-
host: host name or IP address of the server. -
port: listening port of the server. -
A group of setting to configure secure access to the LDAP server:
useStartTLS: use StartTLS.useLDAPS: use Secure LDAP.skipServerCertificateVerify: do not verify the server certificate.serverName: string with the server name. Used when verifying the server certificate.clientCertificatePath: path to client certificate.clientKeyPath: path to client key.rootCertificateAuthoritiesPath: path to the root certificate authorities file.
-
bind: credentials for accessing the LDAP server.dn: distinguished user name.password: user password.
-
search: LDAP search settings.baseDN: base relative distinguished name.filter: LDAP filter used to identify entries in search requests. For example,(&(objectClass=user)(sAMAccountName=%s)).
-
-
statApi: access settings for the Stat API service.enabled: whether the service is enabled. Default value:false.url: service URL. Required ifstatApi.enabledistrue.timeout: timeout of requests to the service. The value can be a number with a time unit and an optional decimal part. Allowed units:ns,us(orµs),ms,s,m, andh. For example:100ms,2.3h,4h35m.retryCount: maximum number of retries for service requests.
-
tasker: settings of the Tasker service, which do administrative actions on API keys.resources: computational resources settings for the service. To find out recommended resource values, see Computational resources.delay: time interval (in seconds). This setting defines the interval of checking tasks that are related to delayed action items (for example, blocking an API key).
-
admin: settings of the API keys admin web service (Web UI).-
host: URL of the API keys frontend. This URL should be accessible from the outside of your Kubernetes cluster, so that users in the private network can browse the URL. -
ingress: configuration of the Ingress resource. Adapt it to your Ingress installation. The URL specified in theingress.hosts.hostparameter should be accessible from the outside of your Kubernetes cluster, so that users in the private network can browse the URL.
-
-
api: settings of the API service.-
adminUsers: a list of credentials of administrator users in theusername1:password1,username2:password2,...format.The Helm chart uses Kubernetes Secrets to store the setting.
noteIf you have a LDAP server, it is recommended to use it for the authentication and skip the
api.adminUserssetting. -
oidc: OpenID Connect (OIDC) provider settings. Required for API key statistics to work in Platform Manager.enabled: whether to enable authentication via OIDC.enableSinglePartnerMode: whether to enable single-partner mode, where all users are bound to the configured partner (company). API key statistics will only be shown for the company specified in thedefaultPartnerparameter.enableExternalProvider: whether to use an external OIDC provider. When enabled, user management is handled by the external provider.url: OIDC provider URL.defaultPartner: partner parameters.
-
ingress: configuration of the Ingress resource. Adapt it to your Ingress installation. The URL specified in theingress.hosts.hostparameter should be accessible from the outside of your Kubernetes cluster, so that users in the private network can browse the URL.
-
-
customCAs: custom certificates settings. -
bundle: text representation of a certificate in the X.509 PEM public-key format. -
certsPath: bundle mount directory in the container.
-
-
Deploy the service with Helm using the created
values-keys.yamlconfiguration file:helm upgrade --install --version=VERSION --atomic --wait-for-jobs --values ./values-keys.yaml keys 2gis-on-premise/keysIn the
--versionparameter, specify the required version of the core services. For a list of versions, see the Core services releases section.warningVersions of services within a component must be the same and match the component version.
-
Add the administrator users to the deployed service via the
keysctlutility. These users will be assigned the API Keys service administrator role.To add a user, execute the following command from the inside of any
keys-apipod:keysctl users add admin 'Keys Service Admin'
3.4. Fetch service tokens
Each On-Premise service that integrates with the API Keys service is forced to share information about the end user's API key usage with the API keys backend by design. To communicate with the backend, the service needs the service token to be configured during the deployment.
To get a list of the service tokens, execute the following command from the inside of any keys-api pod:
keysctl services
3.5. Test deployment
To test the operability of the API Keys service, do the following:
-
Open the admin web interface in a browser (use the value of the
admin.hostsetting from thevalues-keys.yamlfile):https://keys-admin.example.com -
Log in using the administrator user credentials (the one that was granted administrator role via the
keysctlutility). You should see the API Keys service web interface for managing API keys.
3.6. Create API key
To work with the services, add your first partner and create an API key and subscription for them. Without a valid API key, Catalog APIs will not pass the operability test, and other services will not respond. For more information on creating a subscription and API key, see Managing access to API.
You can use one API key for multiple services. To do this, ensure the required services are enabled in the API key settings.
4. Installing Statistics Collection service
Installing the Statistics Collection service is not required if you do not plan to collect and analyze usage statistics for API keys used with the API Platform services.
4.1. Before installing
-
Consider getting familiar with:
-
Make sure the preparation steps are completed:
-
Collect data specified or retrieved on previous steps:
Object Example value How to get value Endpoint of the Docker Registry for storing service images docker.registry.example.comSee Fetching installation artifacts Kubernetes secret to access the Docker Registry onpremise-registry-credsSee Fetching installation artifacts -
Make sure that the resource requirements specified in the Helm chart are met.
For more information on how to do this, see the System requirements document.
Refer to a relevant chartContents of the Helm chart described in this chapter are relevant for the latest API Platform version (see API Platform releases). To find parameters for previous versions, open the values.yaml on GitHub and select a
Platform-<version>tag in the tag switcher on the left. -
Choose domain name for:
- Stat Receiver service, for example:
stat-receiver.example.com - Stat API service (if you are going to install it), for example:
stat-api.example.com
- Stat Receiver service, for example:
4.2. Install the Statistics Collection service
Install Stat Receiver
-
Create a Helm configuration file. See here for more details on the available settings.
The example is prefilled with the necessary data collected on previous steps.
values-stat-receiver.yamldgctlDockerRegistry: docker.registry.example.com
imagePullSecrets: [onpremise-registry-creds]
kafka:
servers: 'keys-kafka.storage.example.local:9092'
securityProtocol: PLAINTEXT
truststore:
enabled: false
keystore:
enabled: false
sasl:
enabled: true
secretName: 'stat-receiver-kafka-creds'
jaasLoginModule: 'org.apache.kafka.common.security.scram.ScramLoginModule'
username: ''
password: ''
initializeTopics:
enabled: true
topicsPrefix: 'stat_master_'Where:
-
dgctlDockerRegistry: endpoint of your Docker Registry with the images of the Urbi On-Premise services in theHOST:PORTformat. -
imagePullSecrets: Kubernetes Secrets to access the Docker Registry with the images of the Urbi On-Premise services. -
kafka: Apache Kafka settings.-
servers: address and port of the Apache Kafka cluster that was configured during the Installation of the API Keys service. -
securityProtocol: protocol used to communicate with brokers. -
truststore.enabled: enable to use TLS for connecting to Kafka. -
keystore.enabled: enable to use client authentication TLS for connecting to Kafka. -
sasl: settings for SASL connection to Kafka.enabled: enable if SASL authentication is also enabled in the API Keys service.secretName: Kubernetes secret name, where the credentials for connecting to Kafka are stored. The name must be unique within the cluster namespace used for installation.jaasLoginModule: JAAS configuration string for SASL connection.username: username for connecting to Kafka. Required if thesecretNamefield is empty.password: password for connecting to Kafka. Required if thesecretNamefield is empty.
-
-
initializeTopics.enabled: enable to have the statistics collection service create the necessary topics in Kafka on first startup. -
topicsPrefix: prefix for the names of the topics that will be created in Kafka. See the name of the topic you specified in thekafka.stats.topicparameter in the API Keys service configuration file: the prefix is the initial part of the topic name up totype.401(fixed part of the name).
-
-
Deploy the service with Helm using the created
values-stat-receiver.yamlconfiguration file:helm upgrade --install --version=VERSION --atomic --wait --timeout 7200s --values ./values-stat-receiver.yaml stat-receiver 2gis-on-premise/stat-receiverIn the
--versionparameter, specify the required API Platform version. For a list of versions, see the API Platform releases section.warningVersions of services within a component must be the same and match the component version.
Install Stat API (optional)
Stat API is used for displaying statistics of request distribution in the Platform Manager.
-
Create a Helm configuration file. See here for more details on the available settings.
The example is prefilled with the necessary data collected on previous steps.
values-stat-api.yamldgctlDockerRegistry: docker.registry.example.com
imagePullSecrets: [onpremise-registry-creds]
migrate:
kafkaTableEngine:
brokers: broker1:9092,broker2:9092
topic: type.401
group: ''
clickhouse:
clientName: stat-api-migrate
clickhouse:
servers: host1:port1,host2:port2
cluster: ''
database: ''
username: clickhouse-user
password: clickhouseP@ssW0rdWhere:
-
dgctlDockerRegistry: endpoint of your Docker Registry with the images of the Urbi On-Premise services in theHOST:PORTformat. -
imagePullSecrets: Kubernetes Secrets to access the Docker Registry with the images of the Urbi On-Premise services. -
migrate: settings for the data migration module from Apache Kafka to ClickHouse.-
kafkaTableEngine: Apache Kafka connection parameters for reading data during migration.brokers: comma-separated list of Kafka broker addresses.topic: name of the Apache Kafka topic containing data from the Stat Receiver service.group: consumer group name.
-
clickhouse.clientName: client name used when connecting to ClickHouse.
-
-
clickhouse: ClickHouse connection parameters.servers: comma-separated list of ClickHouse server addresses.cluster: ClickHouse cluster name for executing distributed queries and migrations.database: ClickHouse database name for connection.username: username for ClickHouse authentication.password: password for ClickHouse authentication.
-
-
Deploy the service with Helm using the created
values-stat-api.yamlconfiguration file:helm upgrade --install --version=VERSION --atomic --wait --timeout 7200s --values ./values-stat-api.yaml stat-api 2gis-on-premise/stat-apiIn the
--versionparameter, specify the required API Platform version. For a list of versions, see the API Platform releases section.warningVersions of services within a component must be the same and match the component version.
4.3. Test deployment
When you install all the necessary API Platform services, you will be able to view their usage statistics in the Platform Manager and configure limits in the web interface of the API Keys service.
5. Installing Traffic API Proxy
Installing Traffic API proxy is not required if you are not going to receive real-time traffic data. This service also requires constant internet access.
5.1. Before installing
-
Consider getting familiar with:
-
Make sure the preparation steps are completed:
-
Collect data specified or retrieved on previous steps:
Object Example value How to get value Endpoint of the Docker Registry for storing service images docker.registry.example.comSee Fetching installation artifacts Kubernetes secret to access the Docker Registry onpremise-registry-credsSee Fetching installation artifacts License key for the Urbi software package DEMO-KEY-DGCTL-AAAAAA-BBBBBBSee Getting an On-Premise license -
Make sure that the resource requirements specified in the Helm chart are met. For more information on how to do this, see the System requirements document.
Refer to a relevant chartContents of the Helm chart described in this chapter are relevant for the latest API Platform version (see API Platform releases). To find parameters for previous versions, open values.yaml on GitHub and select a
Platform-<version>tag in the tag switcher on the left.
5.2. Install Traffic API Proxy service
For navigation services
-
Create a Helm configuration file. See here for more details on the available settings.
The example is prefilled with the necessary data collected on previous steps.
values-traffic-proxy-navi.yamldgctlDockerRegistry: docker.registry.example.com
imagePullSecrets: [onpremise-registry-creds]
replicaCount: 1
proxy:
host: https://datagateway.api.2gis.com
locationDG: true
licenseKey: DEMO-KEY-DGCTL-AAAAAA-BBBBBBWhere:
dgctlDockerRegistry: endpoint of your Docker Registry with the images of the Urbi On-Premise services in theHOST:PORTformat.imagePullSecrets: Kubernetes Secrets to access the Docker Registry with the images of the Urbi On-Premise services.replicaCount: number of the nginx service replicas.proxy: proxy server settings.host: domain name, IP address, or URL of a public Traffic Update server. For the list of available servers, see the Architecture section.locationDG: enables additional contexts for working withdatagateway.api.2gis.com.licenseKey: license key for the Urbi software suite. It is required only iflocationDGistrue.
-
Deploy the service with Helm using the created
values-traffic-proxy-navi.yamlconfiguration file:helm upgrade --install --atomic --wait-for-jobs --values ./values-traffic-proxy-navi.yaml traffic-proxy-navi 2gis-on-premise/traffic-proxy
For map services
-
Create a Helm configuration file. See here for more details on the available settings.
The example is prefilled with the necessary data collected on previous steps.
values-traffic-proxy-map.yamldgctlDockerRegistry: docker.registry.example.com
imagePullSecrets: [onpremise-registry-creds]
replicaCount: 1
proxy:
host: https://jam.api.2gis.com
locationDG: false
ingress:
enabled: true
className: nginx
hosts:
- host: traffic-proxy-map.example.com
paths:
- path: /
pathType: Prefix
tls: []
# - hosts:
# - traffic-proxy-map.example.com
# secretName: secret.tlsWhere:
dgctlDockerRegistry: endpoint of your Docker Registry with the images of the Urbi On-Premise services in theHOST:PORTformat.imagePullSecrets: Kubernetes Secrets to access the Docker Registry with the images of the Urbi On-Premise services.replicaCount: number of the nginx service replicas.proxy: proxy server settings.host: domain name, IP address, or URL of a public Traffic Update server. For the list of available servers, see the Architecture section.locationDG: enables additional contexts for working withdatagateway.api.2gis.com.licenseKey: license key for the Urbi software suite. It is required only iflocationDGistrue.
ingress: configuration of the Ingress resource. Adapt it to your Ingress installation. Note that the path for the host should point to the root:/.
-
Deploy the service with Helm using the created
values-traffic-proxy-map.yamlconfiguration file:helm upgrade --install --atomic --wait-for-jobs --values ./values-traffic-proxy-map.yaml traffic-proxy-map 2gis-on-premise/traffic-proxy
5.3. Test deployment
For navigation services
1. Verify Traffic API Proxy operation
Send the following GET requests to the address specified in the ingress.hosts[0].host parameter of the configuration file for installing traffic API proxy for navigation services:
curl -X GET 'https://traffic-proxy-navi.example.com/eca/traffic/moses/speeds5.json'
curl -X GET 'https://traffic-proxy-navi.example.com/forecast/index.json'
curl -X GET 'https://traffic-proxy-navi.example.com/long-forecast/index.json'
curl -X GET 'https://traffic-proxy-navi.example.com/eta/eta-predictions/index.json'
curl -X GET 'https://traffic-proxy-navi.example.com/navi-castle/restrictions_index.json.zip' --output restrictions_index.json.zip
curl -X GET 'https://traffic-proxy-navi.example.com/navi-castle/restricted_transport.json.zip' --output restricted_transport.json.zip
The response must contain JSON objects and valid archive files.
2. Verify traffic data retrieval by navigation service
To ensure that the Navi-Back service retrieves traffic data through the proxy:
-
Perform any of the preparatory steps:
- Ensure that the
ingress.enabled: "true"parameter is set in the configuration file for installing the Navi-Back service. In the following steps, use the address specified in theingress.hosts[0].hostparameter of the Navi-Back configuration file (for example,https://navi-back-ingress.example.com). - Forward the HTTP port of the Navi-Back container to the host network level to access the service endpoints. In the following steps, use the host IP address and the required port.
- Ensure that the
-
Check the time of the last traffic data retrieval using one of the methods below:
-
Retrieve Navi-Back metrics in Prometheus format via the
/metricsendpoint. Add the path/metricsto the address from the preparation step and send a GET request. Example:curl -X GET 'https://navi-back-ingress.example.com/metrics'The response must contain the
mosesd_jamsmetric (a timestamp of the last traffic data retrieval inUNIX timestampformat) and themosesd_jams_delaymetric (the time elapsed since the last data retrieval). If these metrics are missing, the service could not retrieve traffic data through the proxy. -
In a browser, go to the address from the preparation step and append the path
/cityto it. For example:navi-back-ingress.example.com/city?type=json.The response must be an HTML page containing a
trafficcolumn and the time of the last traffic data retrieval. -
Send a GET request to the address from the preparation step and append the path
/cityto it. For example:curl -X GET 'https://navi-back-ingress.example.com/city?type=json'The response must be a JSON object containing a
trafficfield and the time of the last traffic data retrieval.
-
For map services
1. Verify Traffic API Proxy operation
Perform one of the following steps:
-
In a browser, go to the address specified in the
ingress.hosts[0].hostparameter of the configuration file for installing traffic API proxy for map services, and add the path/meta?reg=65536,108&time&score. For example:traffic-proxy-map.example.com/meta?reg=65536,108&time&score. -
Send a GET request to the same address:
curl -X GET 'https://traffic-proxy-map.example.com/meta?reg=65536,108&time&score'The request should succeed and return a result as a list.
2. Verify traffic data retrieval by MapGL JS API service
To verify that the MapGL JS API service receives traffic data through the proxy:
-
Perform any of the preparation steps:
- Make sure the
ingress.enabled: "true"parameter is set in the configuration file for installing the MapGL JS API service. In the following steps, use the address specified in theingress.hosts[0].hostparameter of the MapGL JS API configuration file (for example,https://mapgl-js-api.example.com). - Forward the HTTP port of the MapGL JS API container to the host network to access the service endpoints. In the following steps, use the host's IP address and port.
- Make sure the
-
Click the traffic icon in the upper-right corner of the map. Traffic jams should be displayed on the map, and the button must display the current traffic level and corresponding color.
6. Installing maps API
6.1. Before installing
-
Consider getting familiar with:
-
Make sure the preparation steps are completed:
-
Collect data specified or retrieved on previous steps:
Object Example value How to get value Endpoint of the Docker Registry for storing service images docker.registry.example.comSee Fetching installation artifacts Kubernetes secret to access the Docker Registry onpremise-registry-credsSee Fetching installation artifacts Endpoint of the S3 compatible Installation Artifacts Storage artifacts.example.comSee Fetching installation artifacts Bucket name for installation artifacts onpremise-artifactsSee Fetching installation artifacts Installation artifacts access key AKIAIOSFODNN7EXAMPLESee Fetching installation artifacts Installation artifacts secret key wJalrXUtnFEMIK7MDENGbPxRfiCYEXAMPLEKEYSee Fetching installation artifacts Path to the manifest file manifests/api-platform/1640661259.jsonSee Fetching installation artifacts License service endpoint https://licenseSee Installing License service API Keys service endpoint http://keys-service-apiSee Installing API Keys service Statistics Collection service endpoint http://statreceiverSee Installing Statistics Collection service Traffic API Proxy endpoint http://traffic-proxySee Installing Traffic API Proxy Service tokens TILES_VECTOR_TOKEN,TILES_RASTER_TOKENSee Installing API Keys service -
Make sure that the resource requirements specified in the Helm charts are met:
For more information on how to do this, see the System requirements document.
Refer to a relevant chartContents of Helm charts described in this chapter are relevant for the latest API Platform version (see API Platform releases). To find parameters for previous versions, open the required values.yaml on GitHub and select a
Platform-<version>tag in the tag switcher on the left. -
Choose domain names for the services.
Example:
- Domain name for MapGL JS API:
mapgl-js-api.example.com - Domain name for Tiles API:
tiles-api.example.com - Domain name for Styles API:
styles.example.com
- Domain name for MapGL JS API:
6.2. Prepare infrastructure
If you use alternatives from the unified register of Russian programs instead of Apache Cassandra, PostgreSQL, and Redis, refer to their official documentation for configuration instructions.
For installing Tiles API
Place one or multiple instances of an Apache Cassandra in the private network.
It is recommended to allow JMX access to Apache Cassandra to enable removing storage snapshots (see Updating Tiles API service).
If Cassandra security settings do not allow automatic creation of keyspaces, you should manually create a keyspace for storing tile data.
Example:
- Hosts:
tiles-cassandra-1.storage.example.localtiles-cassandra-2.storage.example.localtiles-cassandra-3.storage.example.local
- Username:
cassandrauser - Password:
CASSANDRAPASSWORD-DWTYB05URKZJEDDN - JMX username:
jmxuser - JMX password:
JMXPASSWORD-MNZLQTFH0MDDHIX8
For installing Styles API
The Styles API service is required to apply custom map styles. The Styles API is an optional service and is not required for the API platform to operate.
If you plan to install Styles API, additionally perform the following steps:
-
Configure access to the S3 compatible storage:
-
Place an S3 compatible storage with the domain name
s3.storage.example.localin the private network. It is assumed that the storage works on the standard port80. -
Create keys to connect to the service. Save them.
Example:
- Access key:
PHEI4AHTHEETHAHXEEGE - Secret key:
aiw6ahlaeshahngaiJaebie6aeth0aiV2pucuey1
- Access key:
-
Choose a bucket name that will be used for the service.
Example:
stylesThis bucket must be public and have the configured CORS so that the files can be downloaded from a browser of any host.
-
-
Configure the PostgreSQL:
-
Place a PostgreSQL cluster with the domain name
styles-postgresql.storage.example.localin the private network. It is assumed that the cluster works on the standard port5432. -
Connect to the cluster as a superuser (usually
postgres). -
Create a database user and set a password for them:
create user dbuser_styles password 'wNgJamrIym8UAcdX'; -
Create a database owned by this user:
create database onpremise_styles owner dbuser_styles;
-
6.3. Install Maps services
Install Tiles API service
-
Select which variant of Tiles API you want to install: for vector or raster tiles.
-
Create a Helm configuration file. See here for more details on the available settings.
The example is prefilled with the necessary data collected on previous steps.
values-tiles.yamldgctlDockerRegistry: docker.registry.example.com
dgctlStorage:
host: artifacts.example.com
secure: true
bucket: onpremise-artifacts
accessKey: AKIAIOSFODNN7EXAMPLE
secretKey: wJalrXUtnFEMIK7MDENGbPxRfiCYEXAMPLEKEY
manifest: manifests/api-platform/1640661259.json
region : ''
warningText: License expiring in %d days.\nPlease contact your account manager.\n%s
errorText: License expired.\nPlease contact your account manager.\n%s
emailManager: on-premise@2gis.com
types:
- kind: web
- kind: web
subtype: immersive
- kind: web
subtype: relief
cassandra:
environment: prod
hosts:
- tiles-cassandra-1.storage.example.local
- tiles-cassandra-2.storage.example.local
- tiles-cassandra-3.storage.example.local
replicaFactor: 3
consistencyLevelRead: LOCAL_ONE
consistencyLevelWrite: LOCAL_QUORUM
credentials:
user: cassandrauser
password: CASSANDRAPASSWORD-DWTYB05URKZJEDDN
jmxUser: jmxuser
jmxPassword: JMXPASSWORD-MNZLQTFH0MDDHIX8
tls:
enabled: false
enableHostVerification: false
deploySecret: false
ca: ''
# ca: |
# -----BEGIN CERTIFICATE-----
# ...
# -----END CERTIFICATE-----
cert: ''
# cert: |
# -----BEGIN CERTIFICATE-----
# ...
# -----END CERTIFICATE-----
key: ''
# key: |
# -----BEGIN PRIVATE KEY-----
# ...
# -----END PRIVATE KEY-----
importer:
enabled: true
workerNum: 4
writerNum: 8
workerResources:
requests:
cpu: 256m
memory: 512Mi
limits:
cpu: 2
memory: 2048Mi
cleaner:
enabled: true
limit: 3
clearSnapshots: true
api:
imagePullSecrets: [onpremise-registry-creds]
pdb:
enabled: false
ingress:
enabled: true
className: nginx
hosts:
- host: tiles-api.example.com
paths:
- path: /
pathType: Prefix
tls: []
# - hosts:
# - tiles-api.example.com
# secretName: secret.tls
proxy:
access:
enabled: true
url: http://keys-service-api
vector:
token: 'TILES_VECTOR_TOKEN'
raster:
token: 'TILES_RASTER_TOKEN'
stat:
enabled: false
url: 'http://stat-receiver/bss/3'
license:
url: 'https://license'
retryPeriod: 30s
customCAs:
bundle: ''
# bundle: |
# -----BEGIN CERTIFICATE-----
# ...
# -----END CERTIFICATE-----
certsPath: ''Where:
-
dgctlDockerRegistry: endpoint of your Docker Registry with the images of the Urbi On-Premise services in theHOST:PORTformat. -
dgctlStorage: settings for access to the installation artifacts storage.host: endpoint of the S3 compatible installation artifacts storage in theHOST:PORTformat.secure: whether to use HTTPS for interacting with the S3 compatible storage. Default value:false.bucket: S3 bucket name.accessKey: access key for accessing the S3 bucket.secretKey: secret key for accessing the S3 bucket.manifest: path to the manifest file in themanifests/api-platform/1640661259.jsonformat. This file contains the description of pieces of data that the service requires to operate. See Installation artifacts lifecycle.region: S3 compatible storage region.
-
warningText: warning message about upcoming blocking when working with raster tiles. Should contain:%d— placeholder for the number of days before the full block,%s— placeholder for the account manager's contact. -
errorText: message about full blocking when working with raster tile. Should contain%s— placeholder for the account manager's contact. -
emailManager: account manager contact that is used in messages when working with raster tiles. -
types: an array of the one of more tile types the service will provide.types[0].kind: defines the type of tiles to be returned. Possible values:web: vector tiles for MapGL JS API.subtype: vector tiles subtype. Possible values:immersivefor displaying 3D models orrelieffor displaying 3D terrain and models.
raster: raster tiles.native: vector tiles for Mobile SDK versions 12.10.0 or earlier.native-v4: vector tiles for Mobile SDK versions later than 12.10.0.mapbox: vector tiles in the MVT format to be used in third-party GIS systems. For more details, see the Exporting vector tiles section.
-
cassandra: the Apache Cassandra data storage settings.environment: environment name, not more than 7 symbols.hosts: array of the one of more IP addresses or hostnames of the Apache Cassandra installation.replicaFactor: replication factor. Adjust this setting in accordance with the installation.- If necessary, adjust consistency level settings in accordance with the installation.
credentials: authentication credentials. Theuserandpasswordvalues are necessary, whilejmxUserandjmxPasswordare only used for clearing snapshots (see Updating Tiles API service). Default value for each setting iscassandra.tls: TLS configuration for accessing Apache Cassandra.enabled: enable it if Apache Cassandra uses TLS for client connections. Default value:false(disabled).enableHostVerification: enable to verify the host name during the TLS connection. Default value:true(enabled).deploySecret: enable to create a Kubernetes secret that will store TLS certificates for connecting to Apache Cassandra. Default value:false(disabled).ca: root certificate.cert: client certificate.key: client private key for establishing a secure connection.
-
importer: the Kubernetes Importer job's worker settings.-
enabled: whether to enable data import. -
workerNum: number of workers (parallel import processes). -
writerNum: number of write processes per one worker.Recommended settingsWhen deploying the Tiles API with raster tiles support, consider to tune down the values of
workerNum(default:20) andwriterNum(default:8) settings.Import of raster tiles data may take a significant time to complete, and usage of relatively high default settings may result in cancelling the job due to timeout.
-
workerResources: computational resources settings for workers. To find out recommended resource values, see Computational resources. -
cleanerandclearSnapshots: settings for automatic deletion of older data. See Updating Tiles API service for more details.
See the Installation artifacts lifecycle document for details about how the Import job operates.
-
-
api: the API backend service.imagePullSecrets: Kubernetes Secrets to access the Docker Registry with the images of the Urbi On-Premise services.pdb.enabled: enables the protection of the service with Pod Disruption Budget.ingress: configuration of the Ingress resource. Adapt it to your Ingress installation. The URL specified in theapi.ingress.hosts.hostparameter should be accessible from the outside of your Kubernetes cluster, so that users in the private network can browse the URL.
-
proxy: the API Keys service settings. Use these settings if you want to restrict end-user access to the Tiles API service.-
access.enabled: flag that controls whether keys checking for access limiting is enabled. -
access.url: URL of the API Keys service's endpoint. This URL should be accessible from all the pods within your Kubernetes cluster. -
access.vector.token: dedicated service token for getting vector data from the Tiles API service. Fetch the key by executingkeysctlutility. -
access.raster.token: dedicated service token for getting raster data from the Tiles Raster API service. Fetch the key by executingkeysctlutility. -
stat: settings for interaction with the Statistics Collection service.enabled: whether to send key usage statistics.url: URL of the Statistics Collection service.
-
-
license: the License service settings.url: License service URL address. Example:https://license.retryPeriod: how often Tiles API should try to update license status if it is failing to get it.
-
customCAs: custom certificates settings.bundle: text representation of a certificate in the X.509 PEM public-key format.certsPath: bundle mount directory in the container.
-
-
Deploy the service with Helm using created
values-tiles.yamlconfiguration file.helm upgrade --install --version=VERSION --atomic --wait --timeout 7200s --values ./values-tiles.yaml tiles-api 2gis-on-premise/tiles-apiIn the
--versionparameter, specify the required API Platform version. For a list of versions, see the API Platform releases section.warningVersions of services within a component must be the same and match the component version.
Kubernetes Importer job will fetch the required data from the Installation Artifacts Storage and do the import of the data into Apache Cassandra. Then Helm will deploy the service.
Install MapGL JS API service
-
Create a Helm configuration file. See here for more details on the available settings.
The example is prefilled with the necessary data collected on previous steps.
values-mapgl.yamldgctlDockerRegistry: docker.registry.example.com
imagePullSecrets: [onpremise-registry-creds]
env:
MAPGL_DEMO_KEY: ''
MAPGL_HOST: https://mapgl-api.ingress.host
MAPGL_TILES_API: https://tiles-api.ingress.host
MAPGL_TILESET: web
MAPGL_IMMERSIVE_TILESET: web_immersive
MAPGL_TRAFFICSERVER: https://traffic-proxy.ingress.host
MAPGL_STYLESERVER: https://styles.ingress.host
MAPGL_ICONS_URL: https://s3.ingress.host/styles/icons
MAPGL_MODELS_URL: https://s3.ingress.host/styles/assets/models
MAPGL_KEYSERVER: https://keys-api.example.com/public/v1/keys/{keyID}/services/mapgl-js-api
MAPGL_RTLPLUGIN: https://mapgl-api.ingress.host/api/js/plugins/rtl-v1.0.0.js
MAPGL_INVALID_KEY_MESSAGE: Your MapGL key is invalid.
resources:
requests:
cpu: 30m
memory: 32Mi
limits:
cpu: 100m
memory: 96Mi
ingress:
enabled: true
className: nginx
hosts:
- host: mapgl-js-api.example.com
paths:
- path: /
pathType: Prefix
tls: []
# - hosts:
# - mapgl-js-api.example.com
# secretName: secret.tlsWhere:
-
dgctlDockerRegistry: endpoint of your Docker Registry with the images of the Urbi On-Premise services in theHOST:PORTformat. -
imagePullSecrets: Kubernetes Secrets to access the Docker Registry with the images of the Urbi On-Premise services. -
env: environment variables.MAPGL_DEMO_KEY: API key to access the service. Must be generated via the API Keys service.MAPGL_HOST: URL of the service, which your applications use to communicate with the On-Premise Maps service.MAPGL_TILES_API: URL of the Tiles API service.MAPGL_TILESET: tileset of the Tiles API service with vector tiles.MAPGL_IMMERSIVE_TILESET: tileset of the Tiles API service with immersive data tiles (e.g., 3D models).MAPGL_TRAFFICSERVER: URL of the Traffic API Proxy service.MAPGL_STYLESERVER: URL of the Styles API service.MAPGL_ICONS_URL: URL of a style icons directory. URL must be public.MAPGL_MODELS_URL: URL of a style models directory. URL must be public.MAPGL_KEYSERVER: URL of the API Keys service.MAPGL_RTLPLUGIN: URL of the plugin for right-to-left (RTL) languages support.MAPGL_INVALID_KEY_MESSAGE: error message text for invalid MapGL JS API key.
-
resources: computational resources settings for workers. To find out recommended resource values, see Computational resources. -
ingress: configuration of the Ingress resource. Adapt it to your Ingress installation. Note that to use TLS, you need to create a secret containing a certificate and a private key.
-
-
Deploy the service with Helm using created
values-mapgl.yamlconfiguration file.helm upgrade --install --version=VERSION --atomic --values ./values-mapgl.yaml mapgl-js-api 2gis-on-premise/mapgl-js-apiIn the
--versionparameter, specify the required API Platform version. For a list of versions, see the API Platform releases section.warningVersions of services within a component must be the same and match the component version.
Install RasterJS API service
-
Create a Helm configuration file. See here for more details on the available settings.
The example is prefilled with the necessary data collected on previous steps.
values-raster-js-api.yamldgctlDockerRegistry: docker.registry.example.com
imagePullSecrets: [onpremise-registry-creds]
api:
publicHost: raster-js-api.example.com
protocol: 'https:'
tileServerUrl: https://tiles-api.example.com
trafficTileServerUrl: https://traffic-proxy-map.example.com
trafficTimestampServerUrl: https://traffic-proxy-map.example.com
trafficScoreServerUrl: https://traffic-proxy-map.example.com
webApiServerUrl: https://catalog-api.example.com
webApiKey: CATALOG_KEY
key: TILES_RASTER_KEY
keyServerUrl: keys-api.example.com
ingress:
enabled: true
className: nginx
hosts:
- host: raster-js-api.example.com
paths:
- path: /
pathType: Prefix
tls: []
# - hosts:
# - raster-js-api.example.com
# secretName: secret.tls
customCAs:
bundle: ''
# bundle: |
# -----BEGIN CERTIFICATE-----
# ...
# -----END CERTIFICATE-----
certsPath: ''Where:
-
dgctlDockerRegistry: endpoint of your Docker Registry with the images of the Urbi On-Premise services in theHOST:PORTformat. -
imagePullSecrets: Kubernetes Secrets to access the Docker Registry with the images of the Urbi On-Premise services. -
api: settings for the RasterJS API service.publicHost: host on which the service will be available.protocol: protocol for accessing the services used by RasterJS API. Possible values:http:,https:.tileServerUrl: URL of the Tiles API service.webApiServerUrl: URL of the Catalog API service.webApiKey: API key for accessing the Catalog API service. Stored in a Kubernetes Secret and mounted into the container viasecretKeyRef.key: optional API key that will be added to tile requests. Stored in a Kubernetes Secret and mounted into the container viasecretKeyRef.keyServerUrl: URL of the API Keys service.
-
ingress: configuration of the Ingress resource. Adapt it to your Ingress installation. The URL specified in theingress.hosts[0].hostparameter should be accessible from the outside of your Kubernetes cluster, so that users in the private network can browse the URL.enabled: whether to enable Ingress for the service.className: name of the Ingress controller class.hosts[0].host: hostname for Ingress.hosts[0].paths[0].path: path for Ingress.hosts[0].paths[0].pathType: path type for Ingress.tls: TLS configuration.
-
customCAs: custom certificates settings.bundle: text representation of a certificate in the X.509 PEM public-key format.certsPath: bundle mount directory in the container. If not set, the default value is used:/usr/local/share/ca-certificates.
-
-
Deploy the service with Helm using the created
values-raster-js-api.yamlconfiguration file:helm upgrade --install --version=VERSION --atomic --values ./values-raster-js-api.yaml raster-js-api 2gis-on-premise/raster-js-apiIn the
--versionparameter, specify the required API Platform version. For a list of versions, see the API Platform releases section.warningVersions of services within a component must be the same and match the component version.
Install Static API service (optional)
-
Create a Helm configuration file. See here for more details on the available settings.
The example is prefilled with the necessary data collected on previous steps.
values-staticmaps.yamlapp:
access:
enabled: true
stat:
enabled: true
url: http://stat-receiver-api/bss/3
log:
format: json
level: info
dgctlDockerRegistry: docker.registry.example.com
ingress:
className: nginx
enabled: true
hosts:
- host: staticmaps.example.com
paths:
- path: /
pathType: Prefix
tls: []
# - hosts:
# - staticmaps.example.com
# secretName: secret.tls
keys:
token: STATIC_API_TOKEN
url: http://keys-service-api
license:
url: https://license
tiles:
key: TILES_KEY
url: http://tiles-api-rasterWhere:
-
app.access: API Keys service access settings.-
enabled: whether to enable access to the API Keys service. -
stat: Statistics Collection service interaction settings.enabled: whether to enable sending key usage statistics.url: URL of the Statistics Collection service.
-
-
app.log: logging settings.format: log format.level: logging level.
-
dgctlDockerRegistry: endpoint of your Docker Registry with the images of the Urbi On-Premise services in theHOST:PORTformat. -
ingress: Ingress resource configuration. Adapt this configuration to match the Ingress you use. The URL specified in theingress.hosts.hostparameter must be accessible from outside your Kubernetes cluster so that users from a private network segment can access resources at this URL. -
keys: API Keys service access settings.token: service token (see Installing the API Keys service). Required if theapp.access.enabledparameter is set totrue.url: URL of the API Keys service. This URL must be accessible from all pods in your Kubernetes cluster. Required if theapp.access.enabledparameter is set totrue.
-
license.url: URL of the License service. -
tiles: Tiles API service access settings.key: Tiles API access key.url: URL of the Tiles API service. This URL must be accessible from all pods in your Kubernetes cluster.
-
-
Deploy the service with Helm using the created
values-staticmaps.yamlconfiguration file:helm upgrade --install --version=VERSION --atomic --values ./values-staticmaps.yaml staticmaps 2gis-on-premise/staticmapsIn the
--versionparameter, specify the required API Platform version. For a list of versions, see the API Platform releases section.warningVersions of services within a component must be the same and match the component version.
Install Styles API service (optional)
-
Create a Helm configuration file. See here for more details on the available settings.
The example is prefilled with the necessary data collected on previous steps.
values-styles.yamldgctlDockerRegistry: docker.registry.example.com
imagePullSecrets: [onpremise-registry-creds]
log:
level: info
postgres:
host: 'styles-postgresql.storage.example.local'
name: 'onpremise_styles'
username: dbuser_styles
password: wNgJamrIym8UAcdX
s3:
host: 's3.storage.example.local:80'
secure: false
bucket: 'styles'
accessKey: PHEI4AHTHEETHAHXEEGE
secretKey: aiw6ahlaeshahngaiJaebie6aeth0aiV2pucuey1
publicDomain: ''
region: ''
verifySsl: false
api:
resources:
requests:
cpu: 50m
memory: 128Mi
limits:
cpu: 1
memory: 256Mi
ingress:
enabled: true
className: nginx
hosts:
- host: styles.example.com
paths:
- path: /
pathType: Prefix
tls: []
# - hosts:
# - styles-api.example.com
# secretName: secret.tls
keys:
enabled: true
url: http://keys-service-api
token: STYLES_API_TOKEN
dgctlStorage:
host: artifacts.example.com
secure: true
bucket: onpremise-artifacts
accessKey: AKIAIOSFODNN7EXAMPLE
secretKey: wJalrXUtnFEMIK7MDENGbPxRfiCYEXAMPLEKEY
region: ''
manifest: manifests/api-platform/1640661259.json
stylesImport:
startOnDeploy: trueWhere:
-
dgctlDockerRegistry: endpoint of your Docker Registry with the images of the Urbi On-Premise services in theHOST:PORTformat. -
imagePullSecrets: Kubernetes Secrets to access the Docker Registry with the images of the Urbi On-Premise services. -
log.level: logging level. -
postgres: access settings for the PostgreSQL server.host: name or IP address on the PostgreSQL host.name: database name.username: name of the PostgreSQL database user.password: user password to connect to the PostgreSQL database.
-
s3: settings for access to the S3 compatible storage.host: endpoint of the S3 compatible storage in theHOST:PORTformat.secure: whether to use HTTPS for interacting with the S3 compatible storage. Default value:false.bucket: S3 bucket name for storing and publishing styles.accessKey: access key for accessing the S3 bucket.secretKey: secret key for accessing the S3 bucket.publicDomain: domain for public access to the S3 compatible storage using the HTTPS protocol.region: S3 compatible storage region.verifySsl: whether to enable validation of SSL certificates when connecting. Default value:false.
-
api.resources: computational resources settings for the service. To find out recommended resource values, see Computational resources. -
api.ingress: configuration of the Ingress resource. Adapt it to your Ingress installation. The URL specified in theingress.hosts.hostparameter should be accessible from the outside of your Kubernetes cluster, so that users in the private network can browse the URL. -
keys: settings for validating access keys for map styles import.enabled: whether to enable access key validation for map styles import.url: URL of the API Keys service. Required ifkeys.enabledistrue.token: service token for authentication with the API Keys service. Required ifkeys.enabledistrue.
-
dgctlStorage: settings for access to the installation artifacts storage from which the styles import job downloads the default map styles data. Required ifstylesImport.startOnDeployistrue.host: endpoint of the S3 compatible installation artifacts storage in theHOST:PORTformat.secure: whether to use HTTPS for interacting with the S3 compatible storage. Default value:false.bucket: S3 bucket name.accessKey: access key for accessing the S3 bucket.secretKey: secret key for accessing the S3 bucket.region: S3 compatible storage region.manifest: path to the manifest file in themanifests/api-platform/1640661259.jsonformat. This file contains the description of pieces of data, including the default map styles, that the service requires to operate. See Installation artifacts lifecycle.
-
stylesImport.startOnDeploy: whether to automatically run the default styles import job on service install or upgrade.
-
-
Deploy the service with Helm using the created
values-styles.yamlconfiguration file:helm upgrade --install --version=VERSION --atomic --values ./values-styles.yaml styles-api 2gis-on-premise/styles-apiIn the
--versionparameter, specify the required API Platform version. For a list of versions, see the API Platform releases section.warningVersions of services within a component must be the same and match the component version.
6.4. Test deployment
Test Tiles API service
To test that the Tiles API service is working:
-
For raster tiles: open the following URL in your browser (the example is valid for Moscow):
http://tiles-api.example.com/tiles?x=1237&y=640&z=11&v=1A sample raster tile should be displayed.
-
For vector tiles in the MVT format: see the Exporting vector tiles guide.
-
For other vector tiles: see MapGL JS API testing section.
Test MapGL JS API service
To test that the MapGL JS API service is working, use one of the following ways:
-
Open the domain name or IP address of the service in your browser:
http://mapgl-js-api.example.com -
To change the initialization settings of the map, create a
test.htmlfile with the following contents and open it from a browser:<html>
<head>
<title>MapGL JS API. On-Premise</title>
<style>
#map {
width: 100%;
height: 100%;
}
</style>
</head>
<body>
<div id="map"></div>
<script src="//mapgl-js-api.example.com/api.js"></script>
<script>
const map = new mapgl.Map('map', {
center: [55.31878, 25.23584],
zoom: 13,
useRtlTextPlugin: 'always-on', // right-to-left displaying of texts in Arabic
});
</script>
</body>
</html>A sample vector map should be displayed. This map uses vector tiles served by the Tiles API service.
In this case, the style and styleOptions options are not specified, and their default values will be resolved relative to MAPGL_HOST. If you plan to use custom styles, see testing Styles API.
Test RasterJS API service
To test that RasterJS API is working, use one of the following ways:
-
Open the domain name or IP address of the service in your browser:
http://raster-js-api.example.com -
To change the initialization settings of the map, create a
test.htmlfile with the following contents and open it from a browser:<html>
<head>
<title>RasterJS API. On-Premise</title>
</head>
<body>
<div id="map" style="width:500px; height:400px"></div>
<script src="//raster-js-api.example.com/api.js"></script>
<script type="text/javascript">
var map;
DG.then(function () {
map = DG.map('map', {
center: [55.76, 37.62],
zoom: 13,
});
});
</script>
</body>
</html>A sample raster map should be displayed.
Test Static API service
-
Choose arbitrary coordinates (latitude, longitude) within the available territory.
-
Generate a URL:
https://staticmaps.example.com/static/2.0?s=640x400&pt={lat,lon}&z=13&key=YOUR_KEYWhere:
s: image size in pixels.pt: marker coordinates (latitude, longitude).z: zoom level (from 1 to 18). The higher the value, the more detailed the map.key: API key for accessing the service (if theapp.access.enabledparameter is set totrue).
-
Open the URL in a browser. If the service is working correctly, you will receive a map image in PNG format.
Test Styles API service
To apply a custom style to the map, install the Platform Manager and follow the steps for uploading and applying a style.
7. Installing search API
This section describes installation of the Search API service. For instructions on installing the updated version of the service (Search API v8), see Search API new version installation.
7.1. Before installing
-
Consider getting familiar with:
-
Make sure the preparation steps are completed:
-
Collect data specified or retrieved on previous steps:
Object Example value How to get value Endpoint of the Docker Registry for storing service images docker.registry.example.comSee Fetching installation artifacts Kubernetes secret to access the Docker Registry onpremise-registry-credsSee Fetching installation artifacts Endpoint of the S3 compatible Installation Artifacts Storage artifacts.example.comSee Fetching installation artifacts Bucket name for installation artifacts onpremise-artifactsSee Fetching installation artifacts Installation artifacts access key AKIAIOSFODNN7EXAMPLESee Fetching installation artifacts Installation artifacts secret key wJalrXUtnFEMIK7MDENGbPxRfiCYEXAMPLEKEYSee Fetching installation artifacts Path to the manifest file manifests/api-platform/1640661259.jsonSee Fetching installation artifacts License service endpoint https://licenseSee Installing License service API Keys service endpoint http://keys-service-apiSee Installing API Keys service Statistics Collection service endpoint http://stat-receiverSee Installing Statistics Collection service Service token CATALOG_APIS_TOKENSee Installing API Keys service -
Make sure that the resource requirements specified in the Helm charts are met:
For more information on how to do this, see the System requirements document.
Refer to a relevant chartContents of Helm charts described in this chapter are relevant for the latest API Platform version (see API Platform releases). To find parameters for previous versions, open the required values.yaml on GitHub and select a
Platform-<version>tag in the tag switcher on the left. -
Choose domain names for the services.
Example:
- Domain name for Search API:
search-api.example.com - Domain name for Catalog APIs:
catalog-api.example.com
- Domain name for Search API:
7.2. Prepare infrastructure
Configure PostgreSQL
If you use an alternative from the unified register of Russian programs instead of PostgreSQL, refer to its official documentation for configuration instructions.
-
Place a PostgreSQL cluster with the domain name
catalog-postgresql.storage.example.localin the private network. It is assumed that the cluster works on the standard port5432. -
Connect to the cluster as a superuser (usually
postgres). -
Create a database user and set a password for them:
create user dbuser_catalog password '650D7AmZjSR1dkNa'; -
Create a database owned by this user:
create database onpremise_catalog owner dbuser_catalog;The database must be created with the
UTF-8encoding. -
Install the required external extension PostGIS for PostgreSQL.
You can get the extension from the repository where it is available as a ready-made package. For example, for Debian/Ubuntu-based distributions, the installation is performed by the commands:
sudo apt install postgresql-15-postgis-3
sudo apt install postgis -
Enable the necessary database extension:
\c onpremise_catalog

create schema extensions;
grant usage on schema extensions to public;
grant execute on all functions in schema extensions to public;
alter default privileges in schema extensions grant execute on functions to public;
alter default privileges in schema extensions grant usage on types to public;
create extension if not exists plpgsql with schema pg_catalog;
create extension if not exists postgis with schema extensions;
Create API key
The key is checked before installing Catalog APIs.
Add your first partner and create an API key for them. The list of available services for the key must include the search APIs. See the Managing access to API instruction.
7.3. Install search API services
Install Search API service
-
Create a Helm configuration file. See here for more details on the available settings.
The example is prefilled with the necessary data collected on previous steps.
values-search.yamldgctlDockerRegistry: docker.registry.example.com
dgctlStorage:
host: artifacts.example.com
secure: true
bucket: onpremise-artifacts
accessKey: AKIAIOSFODNN7EXAMPLE
secretKey: wJalrXUtnFEMIK7MDENGbPxRfiCYEXAMPLEKEY
manifest: manifests/api-platform/1640661259.json
region: ''
api:
resources:
limits:
cpu: 1
memory: 3Gi
requests:
cpu: 100m
memory: 1Gi
nginx:
resources:
limits:
cpu: 1
memory: 1Gi
requests:
cpu: 100m
memory: 200Mi
customCAs:
bundle: ''
# bundle: |
# -----BEGIN CERTIFICATE-----
# ...
# -----END CERTIFICATE-----
certsPath: ''Where:
-
dgctlDockerRegistry: endpoint of your Docker Registry with the images of the Urbi On-Premise services in theHOST:PORTformat. -
dgctlStorage: settings for access to the installation artifacts storage.host: endpoint of the S3 compatible installation artifacts storage in theHOST:PORTformat.secure: whether to use HTTPS for interacting with the S3 compatible storage. Default value:false.bucket: S3 bucket name.accessKey: access key for accessing the S3 bucket.secretKey: secret key for accessing the S3 bucket.manifest: path to the manifest file in themanifests/api-platform/1640661259.jsonformat. This file contains the description of pieces of data that the service requires to operate. See Installation artifacts lifecycle.region: S3 compatible storage region.
-
api.resources: computational resources settings for the API backend service. To find out recommended resource values, see Computational resources. -
nginx.resources: computational resources settings for the nginx backend service. To find out recommended resource values, see Computational resources. -
customCAs: custom certificates settings.bundle: text representation of a certificate in the X.509 PEM public-key format.certsPath: bundle mount directory in the container.
-
-
Deploy the service with Helm using the created
values-search.yamlconfiguration file.helm upgrade --install --version=VERSION --atomic --values ./values-search.yaml search-api 2gis-on-premise/search-apiIn the
--versionparameter, specify the required API Platform version. For a list of versions, see the API Platform releases section.warningVersions of services within a component must be the same and match the component version.
Install Catalog APIs service
-
Create a Helm configuration file. See here for more details on the available settings.
Data import configurationYou can configure the process of importing new data for Catalog APIs. Use the
importersettings group of the configuration file (see below).The example is prefilled with the necessary data collected on previous steps.
values-catalog.yamldgctlDockerRegistry: docker.registry.example.com
imagePullSecrets: [onpremise-registry-creds]
dgctlStorage:
host: artifacts.example.com
secure: true
bucket: onpremise-artifacts
accessKey: AKIAIOSFODNN7EXAMPLE
secretKey: wJalrXUtnFEMIK7MDENGbPxRfiCYEXAMPLEKEY
manifest: manifests/api-platform/1640661259.json
region: ''
verifySsl: true
api:
postgres:
host: catalog-postgresql.storage.example.local
port: 5432
name: onpremise_catalog
username: dbuser_catalog
password: 650D7AmZjSR1dkNa
ingress:
enabled: true
className: nginx
hosts:
- host: catalog-api.example.com
paths:
- path: /
pathType: Prefix
tls: []
# - hosts:
# - catalog-api.example.com
# secretName: secret.tls
search:
url: http://search-api
keys:
url: http://keys-service-api
token: CATALOG_APIS_TOKEN
stat:
url: 'http://stat-receiver'
enabled: false
request:
enabled: false
search:
enabled: false
importer:
postgres:
host: catalog-postgresql.storage.example.local
port: 5432
name: onpremise_catalog
username: dbuser_catalog
password: 650D7AmZjSR1dkNa
schemaSwitchEnabled: true
cleaner:
enabled: true
versionLimit: 2
license:
url: 'https://license'
requestTimeout: 1s
customCAs:
bundle: ''
# bundle: |
# -----BEGIN CERTIFICATE-----
# ...
# -----END CERTIFICATE-----
certsPath: ''Where:
-
dgctlDockerRegistry: endpoint of your Docker Registry with the images of the Urbi On-Premise services in theHOST:PORTformat. -
imagePullSecrets: Kubernetes Secrets to access the Docker Registry with the images of the Urbi On-Premise services. -
dgctlStorage: settings for access to the installation artifacts storage.host: endpoint of the S3 compatible installation artifacts storage in theHOST:PORTformat.secure: whether to use HTTPS for interacting with the S3 compatible storage. Default value:false.bucket: S3 bucket name.accessKey: access key for accessing the S3 bucket.secretKey: secret key for accessing the S3 bucket.manifest: path to the manifest file in themanifests/api-platform/1640661259.jsonformat. This file contains the description of pieces of data that the service requires to operate. See Installation artifacts lifecycle.region: S3 compatible storage region.verifySsl: whether to enable validation of SSL certificates when connecting todgctlStorage.hostvia HTTPS. Default value:true.
-
api.postgres: the PostgreSQL database access settings. Use the values you configured in the PostgreSQL on the previous step.host: host name of the server.port: port of the server.name: database name.username: user name.password: user password.
-
api.ingress: configuration of the Ingress resource. Adapt it to your Ingress installation. The URL specified in theingress.hosts.hostparameter should be accessible from the outside of your Kubernetes cluster, so that users in the private network can browse the URL. -
search: the Search API service access settings.url: URL of the service. This URL must be accessible from all the pods within your Kubernetes cluster.
-
keys: the API Keys service settings.url: URL of the service. This URL must be accessible from all the pods within your Kubernetes cluster.token: service token for sharing usage statistics with the API Keys service (see Installing API Keys service).
-
stat: settings for interaction with the Statistics Collection service.url: URL of the Statistics Collection service.enabled: whether to send key usage statistics.request.enabled: whether to send API request statistics.search.enabled: whether to send search query data.
-
importer: settings of the data import (Kubernetes Importer job). New datasets are imported only if no imports have been done for the given manifest before.-
postgres: settings of the PostgreSQL server access to import new data for objects.host: host name of the server.port: port of the server.name: database name.username: user name.password: user password.schemaSwitchEnabled: enable/disable working with schemas.true: data is imported to a new schema every time. Switching to older schemas and cleaning them is available.false: creation of new schemas and cleaning the data base is done manually by the administrator.
For details, see the Update Catalog APIs service section.
-
cleaner: settings of automatically removing old data sets.enabled: automatic removal of old data sets is enabled. For details, see the Update Catalog APIs service section.versionLimit: number of old data sets to keep.
For additional information about the import process, see Installation artifacts lifecycle.
-
-
license: the License service settings.url: License service URL address. Example:https://license.requestTimeout: timeout of requests to the License service.
-
customCAs: custom certificates settings.bundle: text representation of a certificate in the X.509 PEM public-key format.certsPath: bundle mount directory in the container.
-
-
Deploy the service with Helm using the created
values-catalog.yamlconfiguration file.helm upgrade --install --version=VERSION --atomic --wait --timeout 7200s --values ./values-catalog.yaml catalog-api 2gis-on-premise/catalog-apiIn the
--versionparameter, specify the required API Platform version. For a list of versions, see the API Platform releases section.warningVersions of services within a component must be the same and match the component version.
If the configuration file contains
importersettings, the command checks if the data already exists in the database and if needed, imports it into PostgreSQL. After that, Helm installs the service.
7.4. Test deployment
To test that the search services are working, send a GET request from the example.com host in the private network:
curl 'catalog-api.example.com/3.0/items/geocode?key=API_KEY&q=City'
Where:
API_KEY- created keyCity- name of the city you want to search the information for
If the installation is successful, the service will return a list of search results in JSON format.
8. Installing navigation API
8.1. Before installing
-
Consider getting familiar with:
-
Make sure the preparation steps are completed:
-
Collect data specified or retrieved on previous steps:
Object Example value How to get value Endpoint of the Docker Registry for storing service images docker.registry.example.comSee Fetching installation artifacts Kubernetes secret to access the Docker Registry onpremise-registry-credsSee Fetching installation artifacts Endpoint of the S3 compatible Installation Artifacts Storage artifacts.example.comSee Fetching installation artifacts Bucket name for installation artifacts onpremise-artifactsSee Fetching installation artifacts Installation artifacts access key AKIAIOSFODNN7EXAMPLESee Fetching installation artifacts Installation artifacts secret key wJalrXUtnFEMIK7MDENGbPxRfiCYEXAMPLEKEYSee Fetching installation artifacts Path to the manifest file manifests/api-platform/1640661259.jsonSee Fetching installation artifacts License service endpoint https://licenseSee Installing License service API Keys service endpoint http://keys-service-apiSee Installing API Keys service Statistics Collection service endpoint http://stat-receiverSee Installing Statistics Collection service Traffic API Proxy endpoint http://traffic-proxySee Installing Traffic API Proxy Service tokens* PUBLIC_TRANSPORT_TOKEN
DISTANCE_MATRIX_TOKEN
ISOCHRONE_TOKEN
MAP_MATCHING_TOKEN
TSP_TOKEN
DIRECTIONS_TOKEN
TRUCK_DIRECTIONS_TOKEN
PAIRS_DIRECTIONS_TOKEN
ROUTES_PLANNER_TOKEN(for working with CityLens)See Installing API Keys service * For illustration purposes, it is assumed that service tokens for all the navigation products are available.
DIRECTIONS_TOKEN,TRUCK_DIRECTIONS_TOKEN, andPAIRS_DIRECTIONS_TOKENare required for the utility Directions API, Truck Directions API, and Pairs Directions API. -
Determine which services you need to install:
- Basic navigation APIs: Routing API, Directions API, Distance Matrix API, Map Matching API, and Isochrone API. For more information on these services, see the overview.
- Distance Matrix Async API for processing large numbers of points. Can be installed separately or along with other APIs. For more information, see the service architecture.
- TSP API for solving the traveling salesman problem (building the shortest route to pass through the specified points). For more information, see the service architecture.
- Restrictions API for managing custom information about road closures. Installed along with other APIs. For more information, see the service architecture.
-
Make sure that the resource requirements specified in the Helm charts are met:
Service Required for which APIs Navi-Castle All Navi-Attractor All Navi-Back All Navi-Router Basic APIs Navi-Front Basic APIs Navi-Restrictions Restrictions API Navi-Splitter Distance Matrix API (belongs to basic APIs) Distance Matrix Async API Distance Matrix Async API, TSP API Navi Async gRPC proxy Distance Matrix Async API if requests to the service will be sent in gRPC format VRP Task Manager TSP API VRP Solver TSP API For more information on how to check resource requirements, see the System requirements document.
Refer to a relevant chartContents of Helm charts described in this chapter are relevant for the latest API Platform version (see API Platform releases). To find parameters for previous versions, open the required values.yaml on GitHub and select a
Platform-<version>tag in the tag switcher on the left. -
Choose domain names for the services.
Example:
- Domain name for Navi-Front:
navi-front.example.com - Domain name for Distance Matrix Async API:
navi-async-matrix.example.com - Domain name for Restrictions API:
navi-restrictions.example.com
- Domain name for Navi-Front:
8.2. Prepare infrastructure
If you use alternatives from the unified register of Russian programs instead of PostgreSQL and Apache Kafka, refer to their official documentation for configuration instructions.
For installing Distance Matrix Async API
If you plan to install Distance Matrix Async API, additionally perform the following steps:
-
Configure the PostgreSQL:
-
Place a PostgreSQL cluster with the domain name
navi-async-matrix-postgresql.storage.example.localin the private network. It is assumed that the cluster works on the standard port5432. -
Connect to the cluster as a superuser (usually
postgres). -
Create a database user and set a password for them:
create user dbuser_navi_async_matrix password 'wNgJamrIym8UAcdX'; -
Create a database owned by this user:
create database onpremise_navi_async_matrix owner dbuser_navi_async_matrix;
-
-
Configure access to the S3 compatible storage:
-
Place an S3 compatible storage with the domain name
navi-async-matrix-s3.storage.example.localin the private network. It is assumed that the storage works on the standard port80. -
Create keys to connect to the service. Save them.
Example:
- Access key:
TRVR4ESNMDDSIXLB3ISV - Secret key:
6gejRs5fyRGKIFjwkiBDaowadGLtmWs2XjEH18YK
- Access key:
-
Choose a bucket name that will be used for the service.
Example:
navi-async-matrix-bucketwarningBy default, the Distance Matrix Async API removes all files older than 14 days from the bucket.
-
-
Configure the Apache Kafka message broker:
-
Place an Apache Kafka cluster with the domain name
kafka.example.localin the private network. It is assumed that the cluster works on the standard port9092. -
Create a user to connect to the service. Save their credentials.
Example:
- Username:
kafka-async-matrix - Password:
1Y2u3gGvi6VjNHUt
- Username:
-
For installing TSP API
If you plan to install TSP API, additionally perform the following steps:
-
Configure the PostgreSQL:
-
Place a PostgreSQL cluster with the domain name
navi-vrp-postgresql.storage.example.localin the private network. It is assumed that the cluster works on the standard port5432. -
Connect to the cluster as a superuser (usually
postgres). -
Create a database user and set a password for them:
create user dbuser_navi_vrp password 'wNgJamrIym8UAcdX'; -
Create a database owned by this user:
create database onpremise_navi_vrp owner dbuser_navi_vrp;
-
-
Configure access to the S3 compatible storage:
Choose a bucket name that will be used for the service in the S3 compatible storage with the domain name
navi-async-matrix-s3.storage.example.local.Example:
navi-vrp-bucket -
Configure the Apache Kafka message broker:
-
Place an Apache Kafka cluster with the domain name
kafka.example.localin the private network. It is assumed that the cluster works on the standard port9092. -
Create a user to connect to the service. Save their credentials.
Example:
- Username:
kafka-vrp - Password:
1Y2u3gGvi6VjNHUt
- Username:
-
For installing Restrictions API
If you plan to install Restrictions API, additionally сonfigure PostgreSQL:
-
Place a PostgreSQL cluster with the domain name
navi-restrictions-postgresql.storage.example.localin the private network. It is assumed that the cluster works on the standard port5432. -
Connect to the cluster as a superuser (usually
postgres). -
Create a database user and set a password for them:
create user dbuser_restrictions password 'jwbK65iFrCCcNrkg'; -
Create a database owned by this user:
create database onpremise_restrictions owner dbuser_restrictions;
8.3. Create a rules file
Navi-Back uses a rules file to specify the type of requests it can serve. This allows a Navi-Back instance to fetch and store a limited set of data from Navi-Castle that is sufficient to serve the specified type of requests.
Navi-Router uses the rules file to determine which Navi-Back instance can process a request.
Create a rules.yaml file with a set of rules required for your installation. You can copy the necessary rules blocks from the example below.
Rule structure
A rule consists of:
name- an arbitrary rule namequeries- a list of query types that can be processed by the instancerouting- a list of transport types whose routes are supported within the rule
Queries type (queries) | Purpose | Consuming service |
|---|---|---|
free_roam | Free navigation without a route. | Mobile SDK |
routing | Building transport routes except for public transport. | Routing API, Directions API |
ctx, public_transport | Building public transport routes. | Routing API |
get_pairs | Building multiple routes in a single call, except for public transport routes. | Routing API |
get_hull | Building proximity zones. | Isochrone API |
map_matching | Reconstructing a route by points. | Map Matching API |
get_dist_matrix | Synchronous and asychronous distance matrix. | Distance Matrix API |
route_planner, area_clustering | Building routes for the CityLens Task Planner. | CityLens Routes API |
Transport type (routing) | Meaning |
|---|---|
driving | Cars |
truck | Trucks |
pedestrian | Pedestrians |
bicycle | Bicycles |
scooter | Scooters |
motorcycle | Motorcycles |
taxi | Taxis |
public_transport, ctx | Public transport |
emergency | Emergency services |
It is recommended to combine rules by transport type. This way, requests related to a specific transport type will be processed by a single Navi-Back instance. For example:
- name: all-truck
  queries: ["routing", "get_dist_matrix"]
  routing: ["truck"]
For different types of requests to be served by different Navi-Back instances (for example, for load balancing or prioritizing certain types of requests), divide the aggregated rule into separate ones. For example:
- name: directions-truck
  queries: ["routing"]
  routing: ["truck"]

- name: distance-matrix-truck
  queries: ["get_dist_matrix"]
  routing: ["truck"]
Rules file example
Copy only blocks required for your installation from the example below:
rules:
    - name: freeroam
      queries: ["free_roam"]
      routing: []

    - name: all-car
      queries: ["routing", "get_hull", "map_matching", "route_planner", "area_clustering", "get_pairs", "get_dist_matrix"]
      routing: ["driving"]

    - name: all-truck
      queries: ["routing", "get_dist_matrix"]
      routing: ["truck"]

    - name: all-pedestrian
      queries: ["routing", "get_hull", "get_pairs", "get_dist_matrix"]
      routing: ["pedestrian"]

    - name: all-bicycle
      queries: ["routing", "get_hull", "get_pairs", "get_dist_matrix"]
      routing: ["bicycle", "scooter"]

    - name: all-taxi
      queries: ["routing", "get_pairs", "get_dist_matrix"]
      routing: ["taxi"]

    - name: all-motorcycle
      queries: ["routing", "get_hull", "get_dist_matrix"]
      routing: ["motorcycle"]

    - name: all-ctx
      queries: ["public_transport", "get_dist_matrix", "get_hull"]
      routing: ["public_transport", "ctx"]

    - name: emergency
      queries: ["routing"]
      routing: ["emergency"]

    - name: async-car
      queries: ["get_dist_matrix"]
      routing: ["driving"]

    - name: async-truck
      queries: ["get_dist_matrix"]
      routing: ["truck"]

    - name: async-bicycle
      queries: ["get_dist_matrix"]
      routing: ["bicycle", "scooter"]

    - name: async-pedestrian
      queries: ["get_dist_matrix"]
      routing: ["pedestrian"]

    - name: async-ctx
      queries: ["get_dist_matrix"]
      routing: ["ctx"]

    - name: route-planner
      queries: ["route_planner", "area_clustering"]
      routing: ["driving"]
8.4. Install navigation API services
Install Navi-Castle service
Installing Navi-Castle is a prerequisite for using any navigation API.
-
Create a Helm configuration file. See here for more details on the available settings.
The example is prefilled with the necessary data collected on previous steps.
values-castle.yamldgctlDockerRegistry: docker.registry.example.com
imagePullSecrets: [onpremise-registry-creds]
dgctlStorage:
host: artifacts.example.com
secure: true
bucket: onpremise-artifacts
accessKey: AKIAIOSFODNN7EXAMPLE
secretKey: wJalrXUtnFEMIK7MDENGbPxRfiCYEXAMPLEKEY
manifest: manifests/api-platform/latest.json
region: ''
resources:
limits:
cpu: 1000m
memory: 512Mi
requests:
cpu: 500m
memory: 128Mi
cron:
enabled:
import: true
restriction: false
restrictionImport: true
schedule:
import: '*/10 * * * *'
restriction: "*/5 * * * *"
restrictionImport: "*/5 * * * *"
concurrencyPolicy: Forbid
successfulJobsHistoryLimit: 3
failedJobsHistoryLimit: 3
init:
enabled:
import: true
restriction: false
restrictionImport: false
customCAs:
bundle: ''
# bundle: |
# -----BEGIN CERTIFICATE-----
# ...
# -----END CERTIFICATE-----
certsPath: ''Where:
-
dgctlDockerRegistry: endpoint of your Docker Registry with the images of the Urbi On-Premise services in theHOST:PORTformat. -
imagePullSecrets: Kubernetes Secrets to access the Docker Registry with the images of the Urbi On-Premise services. -
dgctlStorage: settings for access to the installation artifacts storage.host: endpoint of the S3 compatible installation artifacts storage in theHOST:PORTformat.secure: whether to use HTTPS for interacting with the S3 compatible storage. Default value:false.bucket: S3 bucket name.accessKey: access key for accessing the S3 bucket.secretKey: secret key for accessing the S3 bucket.manifest: path to the manifest file in themanifests/api-platform/latest.jsonformat. This file contains the description of pieces of data that the service requires to operate. See Installation artifacts lifecycle.region: S3 compatible storage region.
-
resources: computational resources settings for the service. To find out recommended resource values, see Computational resources. -
cron: Kubernetes CronJob settings for data import. Cron job fetches actual data from the Installation Artifacts Storage and updates the data on the Navi-Castle replica. These settings are the same for all replicas of the Navi-Castle service.enabled.import: flag that controls whether the jobs for data import are enabled. If the jobs are disabled, none of the Navi-Castle replicas will receive data updates.enabled.restriction,enabled.restrictionImport: flags that control whether the jobs for data import of road closures from the Restrictions API service or for the provided data are enabled, respectively. Flags cannot be enabled at the same time.schedule.import,schedule.restriction: schedules of the jobs in cron format.concurrencyPolicy: job concurrency policy.successfulJobsHistoryLimit: how many completed jobs should be kept.failedJobsHistoryLimit: how many failed jobs should be kept.
-
init: settings of data import during service start.enabled.import: flag that controls whether data import is enabled. If thepersistentVolume.enabledflag is disabled, old data will be lost during the new import.enabled.restriction,enabled.restrictionImport: flags that control whether the Restrictions API service or the import of provided road closure data is enabled, respectively. Flags cannot be enabled at the same time.
-
customCAs: custom certificates settings.bundle: text representation of a certificate in the X.509 PEM public-key format.certsPath: bundle mount directory in the container.
-
-
Deploy the service with Helm using the created
values-castle.yamlconfiguration file.helm upgrade --install --version=VERSION --atomic --values ./values-castle.yaml navi-castle 2gis-on-premise/navi-castleIn the
--versionparameter, specify the required API Platform version. For a list of versions, see the API Platform releases section.warningVersions of services within a component must be the same and match the component version.
On its first start, a Navi-Castle replica will fetch the data from Installation Artifacts Storage. After that, the data will be updated on schedule by the Cron Job.
-
Test Navi-Castle deployment following the instruction now (recommended) on in the end of the installation procedure.
Install Navi-Attractor service
Installing Navi-Attractor is a prerequisite for using any navigation API.
Do the steps below for each navigation type to be installed:
-
Create a Helm configuration file. See here for more details on the available settings. Name the file following the
values-attractor-<transport>.yamlpattern (for example,values-attractor-car.yaml).The example is prefilled with the necessary data collected on previous steps.
values-attractor-TRANSPORT.yamldgctlDockerRegistry: docker.registry.example.com
imagePullSecrets: [onpremise-registry-creds]
navigroup: async
# If this Navi-Attractor entity works with Distance Matrix Async API
kafka:
enabled: true
groupId: navi-async
properties:
bootstrap.servers: kafka.example.local:9092
security.protocol: SASL_PLAINTEXT
sasl.mechanism: SCRAM-SHA-512
sasl.username: kafka-async-matrix
sasl.password: 1Y2u3gGvi6VjNHUt
distanceMatrix:
taskTopic: navi.attract.task.topic
cancelTopic: navi.cancel.topic
statusTopic: navi.attract.status.topic
# If this Navi-Attractor entity works with Distance Matrix Async API
s3:
enabled: true
host: navi-async-matrix-s3.storage.example.local:80
bucket: navi-async-matrix-bucket
accessKey: TRVR4ESNMDDSIXLB3ISV
secretKey: 6gejRs5fyRGKIFjwkiBDaowadGLtmWs2XjEH18YK
attractor:
appRule: async-car
castleUrl: http://navi-castle
# If this Navi-Back entity works with Traffic API Proxy (online data is used)
castleUrlProxy: http://traffic-proxy/navi-castle
restrictions:
enabled: true
resources:
requests:
cpu: 100m
memory: 1024Mi
limits:
cpu: 2
memory: 4000MiWhere:
-
dgctlDockerRegistry: endpoint of your Docker Registry with the images of the Urbi On-Premise services in theHOST:PORTformat. -
imagePullSecrets: Kubernetes Secrets to access the Docker Registry with the images of the Urbi On-Premise services. -
navigroup: ID of a routing group. All components that interact with each other within the same route-building process must have the same value for this parameter. Typically, two standard groups can be used:syncfor synchronous services andasyncfor asynchronous services (for example, Distance Matrix Async API). -
kafka: access settings for the Apache Kafka broker for interacting with Distance Matrix Async API. Specify only if the Navi-Attractor entity is used for working with Distance Matrix Async API.-
groupId: group identifier of the Navi-Attractor service. -
properties: parameters for accessing the Kafka server:Kafka server connection optionsThis configuration file example describes the method of accessing the Kafka server using a login and a password. You can also configure SSL authentication or unauthenticated access: see comments on
kafka.propertiessettings on GitHub.bootstrap.servers: URL of the Kafka server.sasl.username: name of the Kafka user.sasl.password: password for the Kafka user.
-
distanceMatrix: names of the topics for interacting with Distance Matrix Async API. For a detailed diagram of service interactions, see Navigation services architecture.taskTopic: name of the topic for exchanging information on tasks. Distance Matrix Async API writes data and Navi-Attractor reads it.cancelTopic: name of the topic for canceling or finishing tasks. This topic is shared between Navi-Back and Navi-Attractor.statusTopic: name of the Navi-Attractor topic for exchanging information on task statuses. Navi-Attractor writes data and Distance Matrix Async API reads it.
-
-
s3: settings for access to the S3 compatible storage for interacting with Distance Matrix Async API. Specify only if the Navi-Attractor entity is used for working with Distance Matrix Async API.host: endpoint of the S3 compatible storage in theHOST:PORTformat.bucket: S3 bucket name for storing the request data.accessKey: access key for accessing the S3 bucket.secretKey: secret key for accessing the S3 bucket.
-
attractor: Navi-Attractor service settings.appRule: name of the rule from theruleslist for the navigation type to be installed.castleUrl: URL of Navi-Castle service. This URL should be accessible from all the pods within your Kubernetes cluster.castleUrlProxy: proxy URL for obtaining road closures. It has higher priority thancastleUrl.restrictions.enabled: retrieving road closures.
-
resources: computational resources settings for the service. To find out recommended resource values, see Computational resources.
-
-
Deploy the service with Helm using the created
values-attractor-<transport>.yamlconfiguration file.helm upgrade --install --version=VERSION --atomic --values ./rules.yaml --values ./values-attractor-<transport>.yaml --values ./rules.yaml navi-attractor-<transport> 2gis-on-premise/navi-attractorIn the
--versionparameter, specify the required API Platform version. For a list of versions, see the API Platform releases section.warningVersions of services within a component must be the same and match the component version.
-
Repeat steps above for the other transport type, if needed.
Install Navi-Back service
Installing Navi-Back is a prerequisite for using any navigation API.
For each navigation type you need to install a separate Navi-Back entity. Perform the actions below for each navigation type to be installed:
-
Create a Helm configuration file. See here for more details on the available settings. Name the file following the
values-back-<service>.yamlpattern (for example,values-back-directions-car.yaml).The example is prefilled with the necessary data collected on previous steps.
values-back-SERVICE.yamldgctlDockerRegistry: docker.registry.example.com
imagePullSecrets: [onpremise-registry-creds]
# Navigation group names must be different for synchronous and asynchronous Navi-Back entities
navigroup: async
naviback:
appRule: directions-car
castleUrl: http://navi-castle
handlersNumber: 1
# If this Navi-Back entity works with Traffic API Proxy (online data is used)
ecaUrl: http://traffic-proxy-navi/eca
castleUrlProxy: http://traffic-proxy-navi/navi-castle
forecastUrl: http://traffic-proxy-navi/forecast
longForecastUrl: http://traffic-proxy-navi/long-forecast
restrictions:
enabled: true
indices:
etaCorrectionCores:
enabled: true
proxy: true
forecastedLongSpeeds:
enabled: true
forecastedLongSpeedsIndex:
enabled: true
forecastedSpeeds:
enabled: true
forecastedSpeedsIndex:
enabled: true
onlineSpeeds:
enabled: true
speedIndex:
enabled: true
simpleNetwork:
emergency: false
# If this Navi-Back entity works with Distance Matrix API
behindSplitter: true
stat:
enabled: false
url: 'http://stat-receiver/bss/3'
# If this Navi-Back entity does not work with Distance Matrix Async API
# (except for public transport distance matrices)
remoteAttractor:
enabled: true
host: navi-attractor
# If this Navi-Back entity does not work with Distance Matrix Async API
envoy:
resources:
requests:
cpu: 0.1
memory: 128Mi
limits:
cpu: 0.1
memory: 128Mi
replicaCount: 1
resources:
limits:
cpu: 2000m
memory: 16000Mi
requests:
cpu: 1000m
memory: 1024Mi
license:
url: 'https://license'
# If this Navi-Back entity works with Distance Matrix Async API
kafka:
enabled: true
groupId: navi-back
handlersNumber: 2
properties:
bootstrap.servers: kafka.example.local:9092
security.protocol: SASL_PLAINTEXT
sasl.mechanism: SCRAM-SHA-512
sasl.username: kafka-async-matrix
sasl.password: 1Y2u3gGvi6VjNHUt
distanceMatrix:
taskTopic: navi.<navigationType>.task.topic
cancelTopic: navi.cancel.topic
statusTopic: navi.one.to.many.topic
# If this Navi-Back entity works with Distance Matrix Async API
s3:
enabled: true
host: navi-async-matrix-s3.storage.example.local:80
bucket: navi-async-matrix-bucket
accessKey: TRVR4ESNMDDSIXLB3ISV
secretKey: 6gejRs5fyRGKIFjwkiBDaowadGLtmWs2XjEH18YK
customCAs:
bundle: ''
# bundle: |
# -----BEGIN CERTIFICATE-----
# ...
# -----END CERTIFICATE-----
certsPath: ''Where:
-
dgctlDockerRegistry: endpoint of your Docker Registry with the images of the Urbi On-Premise services in theHOST:PORTformat. -
imagePullSecrets: Kubernetes Secrets to access the Docker Registry with the images of the Urbi On-Premise services. -
navigroup: ID of a routing group. All components that interact with each other within the same route-building process must have the same value for this parameter. Typically, two standard groups can be used:syncfor synchronous services andasyncfor asynchronous services (for example, Distance Matrix Async API). -
naviback: Navi-Back service settings.-
appRule: name of the rule from theruleslist for the navigation type to be installed. Note that routing and distance matrix calculation use different rules. -
castleUrl: URL of Navi-Castle service. This URL should be accessible from all the pods within your Kubernetes cluster. -
handlersNumber: number of parallel calculation threads. When processing many small tasks (short routes), it is recommended to set this value lower thankafka.handlersNumber. When processing a few large tasks, it is recommended to set it equal tokafka.handlersNumber. -
ecaUrl: proxy URL for retrieving speeds. -
castleUrlProxy: proxy URL for retrieving road closures. It has higher priority thancastleUrl. -
forecastUrl: proxy URL for retrieving short-term speed forecasts. -
longForecastUrl: proxy URL for retrieving long-term speed forecasts. -
restrictions.enabled: retrieving road closures. -
indices: data connection for file downloads. If you obtain data using Traffic API Proxy, the parameters below are required and must betrue:-
etaCorrectionCores: travel time correction coefficients.-
enabled: retrieving travel time correction coefficients. -
proxy: using the proxy URLnaviback.castleUrlProxyinstead ofnaviback.castleUrlornaviback.castleHost.
-
-
forecastedLongSpeeds.enabled: long-term speed forecast (from 1 to 24 hours). -
forecastedLongSpeedsIndex.enabled: retrieving the index of long-term speed forecasts. -
forecastedSpeeds.enabled: short-term speed forecast (up to 1 hour). -
forecastedSpeedsIndex.enabled: retrieving the index of short-term speed forecasts. -
onlineSpeeds.enabled: current speeds, can be updated once per minute. -
speedIndex.enabled: retrieving the index of current speeds.
-
-
simpleNetwork.emergency: enable support for emergency vehicle routes.Note that to be able to build such routes, you also need to add the
emergencyrouting type to one of the projects in your rules.yaml file. -
behindSplitter: whether Navi-Back interacts with the Navi-Splitter service. Set totrueonly if the Navi-Back entity is used for working with Distance Matrix API (in synchronous mode). -
stat: settings for interaction with the Statistics Collection service.enabled: whether to send key usage statistics.url: URL of the Statistics Collection service.
-
-
remoteAttractor: Navi-Attractor interaction settings. Specify only if the Navi-Back entity is not used for working with Distance Matrix Async API (except for asynchronous calculation of public transport distance matrices, for which Navi-Attractor interaction is required).enabled: whether interaction with Navi-Attractor is required.host: URL of the Navi-Attractor service.
-
envoy: load balancer settings. Specify only if the Navi-Back entity is not used for working with Distance Matrix Async API. -
replicaCount: number of the Navi-Back service replicas. -
resources: computational resources settings for the service. To find out recommended resource values, see Computational resources. -
license: the License service settings.url: License service URL address. Example:https://license.
-
kafka: access settings for the Apache Kafka broker for interacting with Distance Matrix Async API.-
groupId: group identifier of the Navi-Back service. -
handlersNumber: number of tasks simultaneously consumed from Apache Kafka. When processing many small tasks (short routes), it is recommended to set this value higher thannaviback.handlersNumber. When processing a few large tasks, it is recommended to set it equal tonaviback.handlersNumber. -
properties: parameters for accessing the Kafka server:Kafka server connection optionsThis configuration file example describes the method of accessing the Kafka server using a login and a password. You can also configure SSL authentication or unauthenticated access: see comments on
kafka.propertiessettings on GitHub.bootstrap.servers: URL of the Kafka server.sasl.username: name of the Kafka user.sasl.password: password for the Kafka user.
-
distanceMatrix: names of the topics for interacting with Distance Matrix Async API. For a detailed diagram of service interactions, see Navigation services architecture.-
taskTopic: name of the topic for exchanging information on tasks. Distance Matrix Async API reads it writes data and Navi-Back reads it. Come up with and specify the requirednavigationType: for example,bicycle, orpedestrian. When using several Navi-Back entities, specify a uniquetaskTopicfor each one.For asynchronous distance matrices for public transport, you need to configure two Navi-Back entities that will use different Apache Kafka topics:
- For the
navi-back-distance-matrix-ctxentity (matrix calculation), specifynavi.ctx.task.topicin thetaskTopicparameter. - For the
navi-back-find-platformentity (platform search), specifynavi.find.platform.task.topicin thetaskTopicparameter.
- For the
-
cancelTopic: name of the topic for canceling or finishing tasks. This topic is shared between Navi-Back and Navi-Attractor. -
statusTopic: name of the topic for exchanging information on task statuses. Navi-Back writes data and Distance Matrix Async API reads it. Fornavi-back-find-platform, specifynavi.find.platform.status.topic.For asynchronous distance matrices for public transport, you need to configure two Navi-Back entities that will use different Apache Kafka topics:
- For the
navi-back-distance-matrix-ctxentity (matrix calculation), specifynavi.one.to.many.topicin thestatusTopicparameter. - For the
navi-back-find-platformentity (platform search), specifynavi.find.platform.status.topicin thestatusTopicparameter.
- For the
-
-
-
s3: settings for access to the S3 compatible storage for interacting with Distance Matrix Async API.host: endpoint of the S3 compatible storage in theHOST:PORTformat.bucket: S3 bucket name for storing the request data.accessKey: access key for accessing the S3 bucket.secretKey: secret key for accessing the S3 bucket.
-
customCAs: custom certificates settings.bundle: text representation of a certificate in the X.509 PEM public-key format.certsPath: bundle mount directory in the container.
-
-
Deploy the service with Helm using the created
values-back-<service>.yamlconfiguration file.helm upgrade --install --version=VERSION --atomic --values ./rules.yaml --values ./values-back-<service>.yaml navi-back-<service> 2gis-on-premise/navi-backIn the
--versionparameter, specify the required API Platform version. For a list of versions, see the API Platform releases section.warningVersions of services within a component must be the same and match the component version.
Example of the command for installing Directions API for car routes:
helm upgrade --install --version=VERSION --atomic --values ./rules.yaml --values ./values-back-directions-car.yaml navi-back-directions-car 2gis-on-premise/navi-back -
Test Navi-Back deployment following the instruction now (recommended) on in the end of the installation procedure.
-
Repeat steps above for the next navigation type.
Install Navi-Splitter service (optional)
Installing Navi-Splitter is a prerequisite for using Distance Matrix API (in synchronous mode).
-
Create a Helm configuration file. See here for more details on the available settings.
The example is prefilled with the necessary data collected on previous steps.
values-splitter.yamldgctlDockerRegistry: docker.registry.example.com
imagePullSecrets: [onpremise-registry-creds]
splitter:
appRule:
# If you plan to work with Distance Matrix API for public transport
ctxUrl: http://navi-back-distance-matrix-ctx.svc/ctx/2.0/?source=distance_matrix
ctxBaseUrl: http://navi-back-distance-matrix-ctx.svc/ctx/2.0
findPlatformUrl: http://navi-back-distance-matrix-ctx/find_platforms
attractor:
enabled: true
host: navi-attractor.svc
oneToMany:
enabled: true
host: navi-back-headless.svc
passThrough:
enabled: true
host: navi-back.svcWhere:
-
dgctlDockerRegistry: endpoint of your Docker Registry with the images of the Urbi On-Premise services in theHOST:PORTformat. -
imagePullSecrets: Kubernetes Secrets to access the Docker Registry with the images of the Urbi On-Premise services. -
splitter: Navi-Splitter service settings.appRule: name of the rule from theruleslist for the navigation type to be installed.ctxUrl: full URL of the Navi-Back host for working with Distance Matrix API for public transport. Specify if you plan to work with this type of matrices.ctxBaseUrl: base URL of the Navi-Back host for working with Distance Matrix API for public transport. Specify if you plan to work with this type of matrices.findPlatformUrl: the full URL of the host for searching stop platforms when building public transport routes in thehttp(s)://HOST:PORT/find_platformsformat
-
attractor: Navi-Attractor service settings.enabled: whether the Navi-Attractor service integration is enabled.host: host name of the Navi-Attractor service.
-
oneToMany: configuration for supporting routes from one point to multiple destinations.enabled: whether support for one-to-many routes via Navi-Back is enabled. Set totrueif you plan to use Distance Matrix API.host: Navi-Back host name.
-
passThrough: configuration for proxying requests directly to another service.enabled: whether direct proxying to Navi-Back is enabled. Set totrueif you plan to use other basic APIs besides Distance Matrix API.host: Navi-Back host name to which requests are proxied.
-
-
Deploy the service with Helm using the created
values-splitter.yamlconfiguration file.helm upgrade --install --version=VERSION --atomic --values ./values-splitter.yaml navi-splitter 2gis-on-premise/navi-splitterIn the
--versionparameter, specify the required API Platform version. For a list of versions, see the API Platform releases section.warningVersions of services within a component must be the same and match the component version.
-
Test Navi-Splitter deployment following the instruction now (recommended) on in the end of the installation procedure.
Install Navi-Router service
Installing Navi-Router is a prerequisite for using basic navigation APIs.
-
Create a Helm configuration file. See here for more details on the available settings.
The example is prefilled with the necessary data collected on previous steps.
values-router.yamldgctlDockerRegistry: docker.registry.example.com
imagePullSecrets: [onpremise-registry-creds]
navigroup: sync
router:
logLevel: Warning
castleUrl: http://navi-castle.svc
keys:
enabled: true
url: http://keys-service-api/service/v1/keys
refreshIntervalSec: 30
downloadTimeoutSec: 30
apis:
comboroutes-api: ''
directions-api: ''
distance-matrix-api: ''
freeroam-api: ''
isochrone-api: ''
map-matching-api: ''
pairs-directions-api: ''
ppnot-api: ''
public-transport-api: ''
truck-directions-api: ''
truck-distance-matrix-api: ''
routing-api: ''
route-planner-api: '' # for working with CityLens
replicaCount: 2
resources:
limits:
cpu: 2000m
memory: 1024Mi
requests:
cpu: 500m
memory: 128MiWhere:
-
dgctlDockerRegistry: endpoint of your Docker Registry with the images of the Urbi On-Premise services in theHOST:PORTformat. -
imagePullSecrets: Kubernetes Secrets to access the Docker Registry with the images of the Urbi On-Premise services. -
navigroup: ID of a routing group. All components that interact with each other within the same route-building process must have the same value for this parameter. Typically, two standard groups can be used:syncfor synchronous services andasyncfor asynchronous services (for example, Distance Matrix Async API). -
router: Navi-Router service settings.logLevel: logging level, default isWarning. Available levels:Verbose,Info,Warning,Error,Fatal.castleUrl: URL of the Navi-Castle service. This URL must be accessible from all the pods within your Kubernetes cluster.
-
keys: API Keys settings. If this parameter is omitted, the API key verification step will be skipped.enabled: whether API Keys usage is turned on.url: URL of the API Keys service endpoint. This URL must be accessible from all the pods within your Kubernetes cluster.refreshIntervalSec: interval between key updates in seconds.downloadTimeoutSec: timeout of key downloading in seconds.apis: service tokens for sharing usage statistics with the API Keys service (see Fetching the service tokens).
-
replicaCount: number of service replicas. -
resources: computational resources settings for the service. To find out recommended resource values, see Computational resources.
-
-
Deploy the service with Helm using the created
values-router.yamlconfiguration file.helm upgrade --install --version=VERSION --atomic --values ./rules.yaml --values ./values-router.yaml navi-router 2gis-on-premise/navi-routerIn the
--versionparameter, specify the required API Platform version. For a list of versions, see the API Platform releases section.warningVersions of services within a component must be the same and match the component version.
-
Test Navi-Router deployment following the instruction now (recommended) on in the end of the installation procedure.
Install Navi-Front service
Installing Navi-Front is a prerequisite for using basic navigation APIs.
-
Create a Helm configuration file. See here for more details on the available settings.
The example is prefilled with the necessary data collected on previous steps.
values-front.yamldgctlDockerRegistry: docker.registry.example.com
imagePullSecrets: [onpremise-registry-creds]
navigroup: sync
replicaCount: 2
resources:
limits:
cpu: 100m
memory: 128Mi
requests:
cpu: 100m
memory: 128Mi
ingress:
enabled: true
className: nginx
hosts:
- host: navi-front.example.com
paths:
- path: /
pathType: Prefix
tls: []
# - hosts:
# - navi-front.example.com
# secretName: secret.tlsWhere:
dgctlDockerRegistry: endpoint of your Docker Registry with the images of the Urbi On-Premise services in theHOST:PORTformat.imagePullSecrets: Kubernetes Secrets to access the Docker Registry with the images of the Urbi On-Premise services.navigroup: ID of a routing group. All components that interact with each other within the same route-building process must have the same value for this parameter. Typically, two standard groups can be used:syncfor synchronous services andasyncfor asynchronous services (for example, Distance Matrix Async API).replicaCount: number of service replicas.resources: computational resources settings for the service. To find out recommended resource values, see Computational resources.ingress: configuration of the Ingress resource. Adapt it to your Ingress installation. The URL specified in theingress.hosts.hostparameter should be accessible from the outside of your Kubernetes cluster, so that users in the private network can browse the URL.
-
Deploy the service with Helm using the created
values-front.yamlconfiguration file.helm upgrade --install --version=VERSION --atomic --values ./values-front.yaml navi-front 2gis-on-premise/navi-frontIn the
--versionparameter, specify the required API Platform version. For a list of versions, see the API Platform releases section.warningVersions of services within a component must be the same and match the component version.
-
Test Navi-Front deployment following the instruction now (recommended) on in the end of the installation procedure.
Install Distance Matrix Async API service (optional)
Installing Distance Matrix Async API is a prerequisite for using Distance Matrix Async API or TSP API.
-
Create a Helm configuration file. See here for more details on the available settings.
The example is prefilled with the necessary data collected on previous steps.
values-navi-async-matrix.yamldgctlDockerRegistry: docker.registry.example.com
imagePullSecrets: [onpremise-registry-creds]
resources:
requests:
cpu: 100m
memory: 100Mi
limits:
cpu: 1
memory: 1Gi
dm:
citiesUrl: http://navi-castle/cities.conf
merger:
resources:
requests:
cpu: 100m
memory: 100Mi
limits:
cpu: 1
memory: 1Gi
serviceAccount:
create: true
s3:
host: http://navi-async-matrix-s3.storage.example.local:80
bucket: navi-async-matrix-bucket
accessKey: TRVR4ESNMDDSIXLB3ISV
secretKey: 6gejRs5fyRGKIFjwkiBDaowadGLtmWs2XjEH18YK
region: ''
db:
host: navi-async-matrix-postgresql.storage.example.local
port: 5432
name: onpremise_navi_async_matrix
user: dbuser_navi_async_matrix
password: wNgJamrIym8UAcdX
schema: public
tls:
enabled: false
rootCert: ''
cert: ''
key: ''
mode: verify-full
kafka:
groupId: navi_async
properties:
bootstrap.servers: kafka.example.local:9092
security.protocol: SASL_PLAINTEXT
sasl.mechanism: SCRAM-SHA-512
sasl.plain.username: kafka-async-matrix
sensitiveProperties:
sasl.plain.password: 1Y2u3gGvi6VjNHUt
cancelTopic: navi.cancel.topic
mergerGroupId: navi_async_matrix_merger
mergerStatusTopic: navi.merger.status.topic
mergerTaskTopic: navi.merger.task.topic
attractTopic: navi.attract.status.topic
oneToManyTopic: navi.one.to.many.topic
vrpStatusTopic: navi.tsp.message.bus.topic
findPlatformTopic: navi.find.platform.status.topic # for public transport routes
maxMessageSizeBytes: 1048576
taskTopicRules:
- topic: navi.task.topic
default: true
type: car
- topic: navi.ctx.task.topic # for public transport routes
type: public-transport
default: true
attractTopicRules:
- topic: navi.attract.task.topic
default: true
type: car
# For public transport routes
findPlatformTopicRules:
- topic: navi.find.platform.task.topic
default: true
type: public-transport
keys:
url: http://keys-service-api/service/v1/keys
token: DISTANCE_MATRIX_TOKEN
ingress:
enabled: true
className: nginx
hosts:
- host: navi-async-matrix.example.com
paths:
- path: /
pathType: Prefix
tls: []
# - hosts:
# - navi-async-matrix.example.com
# secretName: secret.tls
customCAs:
bundle: ''
# bundle: |
# -----BEGIN CERTIFICATE-----
# ...
# -----END CERTIFICATE-----
certsPath: ''Where:
-
dgctlDockerRegistry: endpoint of your Docker Registry with the images of the Urbi On-Premise services in theHOST:PORTformat. -
imagePullSecrets: Kubernetes Secrets to access the Docker Registry with the images of the Urbi On-Premise services. -
resources: computational resources settings for the service. To find out recommended resource values, see Computational resources. -
dm: Distance Matrix Async API service settings.citiesUrl: URL of the information about cities provided by the Navi-Castle service.merger: Distance Matrix Async Merger service settings.
-
serviceAccount.create: whether to create a service account. -
s3: settings for access to the S3 compatible storage.host: endpoint of the S3 compatible storage in theHOST:PORTformat.bucket: S3 bucket name for storing the request data. By default, the Distance Matrix Async API removes all files older than 14 days from the bucket.accessKey: access key for accessing the S3 bucket.secretKey: secret key for accessing the S3 bucket.region: S3 compatible storage region.
-
db: access settings for the PostgreSQL server.-
host: host name or IP address of the PostgreSQL server. -
port: listening port of the PostgreSQL server. -
name: database name. -
userandpassword: credentials for accessing the database specified in thenamesetting. The user must be the owner of this database or a superuser. -
schema: PostgreSQL schema to use. Default value ispublic. -
tls: settings for the mTLS connection to the database:-
enabled: whether mTLS connection to a PostgreSQL server is enabled. -
rootCert: root certificate file. -
cert: certificate of the PostgreSQL server. -
key: key of the PostgreSQL server. -
mode: level of protection, one of the following:verify-full(recommended): eavesdropping and MITM protection.verify-ca: eavesdropping protection is implemented, MITM protection depends on the CA policy.require: eavesdropping protection is implemented.prefer: eavesdropping protection is possible if supported by the server.allow: eavesdropping protection is possible if required by the server.disable: no protection.
-
-
-
kafka: access settings for the Apache Kafka broker. For a detailed diagram of service interactions via Apache Kafka, see Navigation services architecture.-
groupId: group identifier of the Distance Matrix Async API service. -
properties: parameters for accessing the Kafka server:Kafka server connection optionsThis configuration file example describes the method of accessing the Kafka server using a login and a password. You can also configure SSL authentication or unauthenticated access: see comments on
kafka.propertiessettings on GitHub.bootstrap.servers: URL of the Kafka server.sasl.plain.username: name of the Kafka user.
-
sensitiveProperties.sasl.plain.password: password for the Kafka user. -
cancelTopic: name of the topic for canceling or obtaining information about finished tasks. This topic is shared between Navi-Back and Navi-Attractor. -
mergerGroupId: group identifier of the Distance Matrix Async Merger service. -
mergerStatusTopic: name of the topic for obtaining information about the status of Distance Matrix Async Merger tasks. Distance Matrix Async Merger writes data and Distance Matrix Async API reads it. -
mergerTaskTopic: name of the topic for receiving tasks for Distance Matrix Async Merger. Distance Matrix Async API writes data and Distance Matrix Async Merger reads it. -
attractTopic: name of the topic for obtaining task results from Navi-Attractor. Navi-Attractor writes data and Distance Matrix Async API reads it. -
oneToManyTopic: name of the topic for exchanging information on task statuses. Navi-Back writes data and Distance Matrix Async API reads it. -
vrpStatusTopic: name of the topic for communicating with the VRP Task Manager service. -
findPlatformTopic: name of the topic for data on stop platforms for public transport. -
maxMessageSizeBytes: maximum message size in bytes for data transmitted through Apache Kafka. The default value is 1 MB. If a message exceeds this threshold, it is stored and transmitted via an S3 compatible storage. When configuring this parameter, consider the Apache Kafka data retention time (retention_time), queue size, and database cleanup policy. -
taskTopicRules: information about the topics that Distance Matrix Async API will use to send the requests. Defined as a list where each element must have two parameters:-
topic: name of the Navi-Back topic. Distance Matrix Async API writes data and Navi-Back reads it. -
projectsordefault: parameters that define which requests to send to the topic.Distance Matrix Async API sends requests to different topics based on their projects. For each topic other than the default one, the
projectssetting must be defined containing a list of projects (see rules file). For the default topic, thedefault: truesetting must be defined. The default topic will be used to send the requests related to the projects not listed in any other topic'sprojects.The configuration must contain one and only one topic with
default: true. -
type: routing transport type.
-
-
attractTopicRules: rules for mapping request types with topics.-
topic: name of the Navi-Attractor topic. Distance Matrix Async API writes data and Navi-Attractor reads it. -
projectsordefault: parameters that define which requests to send to the topic.Distance Matrix Async API sends requests to different topics based on their projects. For each topic other than the default one, the
projectssetting must be defined containing a list of projects (see rules file). For the default topic, thedefault: truesetting must be defined. The default topic will be used to send the requests related to the projects not listed in any other topic'sprojects.The configuration must contain one and only one topic with
default: true. -
type: routing transport type.
-
-
findPlatformTopicRules: parameters that define which requests to send to the topic.-
topic: name of the topic for data on stop platforms for public transport. -
projectsordefault: parameters that define which requests to send to the topic.Distance Matrix Async API sends requests to different topics based on their projects. For each topic other than the default one, the
projectssetting must be defined containing a list of projects (see rules file). For the default topic, thedefault: truesetting must be defined. The default topic will be used to send the requests related to the projects not listed in any other topic'sprojects.The configuration must contain one and only one topic with
default: true. -
type: routing transport type.
-
-
-
keys: the API Keys service settings.url: URL of the service. This URL should be accessible from all the pods within your Kubernetes cluster.token: service token (see Installing API Keys service).
-
ingress: configuration of the Ingress resource. Adapt it to your Ingress installation. The URL specified in theingress.hosts.hostparameter should be accessible from the outside of your Kubernetes cluster, so that users in the private network can browse the URL. -
customCAs: custom certificates settings.bundle: text representation of a certificate in the X.509 PEM public-key format.certsPath: bundle mount directory in the container.
-
-
Deploy the service with Helm using the created
values-navi-async-matrix.yamlconfiguration file.helm upgrade --install --version=VERSION --atomic --values ./values-navi-async-matrix.yaml navi-async-matrix 2gis-on-premise/navi-async-matrixIn the
--versionparameter, specify the required API Platform version. For a list of versions, see the API Platform releases section.warningVersions of services within a component must be the same and match the component version.
Install Navi Async gRPC proxy service (optional)
Installing Navi Async gRPC proxy is a prerequisite if requests to Distance Matrix Async API will be sent in the gRPC format.
-
Create a Helm configuration file. See here for more details on the available settings.
The example is prefilled with the necessary data collected on previous steps.
values-navi-async-grpc-proxy.yamldgctlDockerRegistry: docker.registry.example.com
imagePullSecrets: [onpremise-registry-creds]
dm:
url: http://navi-async-matrix.host
port: 80Where:
-
dgctlDockerRegistry: endpoint of your Docker Registry with the images of the Urbi On-Premise services in theHOST:PORTformat. -
imagePullSecrets: Kubernetes Secrets to access the Docker Registry with the images of the Urbi On-Premise services. -
dm: settings to access the Distance Matrix Async API service.url: host URL.port: listening port of the server.
-
-
Deploy the service with Helm using the created
values-navi-async-grpc-proxy.yamlconfiguration file.helm upgrade --install --version=VERSION --atomic --values ./values-navi-async-grpc-proxy.yaml navi-async-grpc-proxy 2gis-on-premise/navi-async-grpc-proxyIn the
--versionparameter, specify the required API Platform version. For a list of versions, see the API Platform releases section.warningVersions of services within a component must be the same and match the component version.
Install VRP Solver service (optional)
Installing VRP Solver is a prerequisite for using TSP API.
-
Create a Helm configuration file. See here for more details on the available settings.
The example is prefilled with the necessary data collected on previous steps.
values-vrp-solver.yamldgctlDockerRegistry: docker.registry.example.com
imagePullSecrets: [onpremise-registry-creds]
resources:
limits:
cpu: 1000m
memory: 2Gi
requests:
cpu: 3000m
memory: 8Gi
kafka:
groupId: navi_vrp_solver
properties:
bootstrap.servers: kafka.example.local:9092
security.protocol: SASL_PLAINTEXT
sasl.mechanism: SCRAM-SHA-512
sasl.plain.username: kafka-async-matrix
sensitiveProperties:
sasl.plain.password: 1Y2u3gGvi6VjNHUt
taskTopic: navi.tsp.task.topic
statusTopic: navi.tsp.status.topic
s3:
url: http://navi-async-matrix-s3.storage.example.local:80
dm:
bucket: navi-async-matrix-bucket
accessKey: TRVR4ESNMDDSIXLB3ISV
secretKey: 6gejRs5fyRGKIFjwkiBDaowadGLtmWs2XjEH18YK
vrp:
bucket: navi-vrp-bucket
accessKey: TRVR4ESNMDDSIXLB3ISV
secretKey: 6gejRs5fyRGKIFjwkiBDaowadGLtmWs2XjEH18YK
# For car and truck routes
naviFront:
url: http://navi-front/carrouting/6.0.1/global
key: keyWhere:
-
dgctlDockerRegistry: endpoint of your Docker Registry with the images of the Urbi On-Premise services in theHOST:PORTformat. -
imagePullSecrets: Kubernetes Secrets to access the Docker Registry with the images of the Urbi On-Premise services. -
resources: computational resources settings for the service. To find out recommended resource values, see Computational resources. -
kafka: access settings for the Apache Kafka broker.-
groupId: group identifier of the VRP Solver service. -
properties: parameters for accessing the Kafka server:Kafka server connection optionsThis configuration file example describes the method of accessing the Kafka server using a login and a password. You can also configure SSL authentication or unauthenticated access: see comments on
kafka.propertiessettings on GitHub.bootstrap.servers: URL of the Kafka server.sasl.plain.username: name of the Kafka user.
-
sensitiveProperties.sasl.plain.password: password for the Kafka user. -
taskTopic: name of the topic for getting tasks from VRP Task Manager. -
statusTopic: name of the topic for sending requests to VRP Task Manager.
-
-
s3: settings for access to the S3 compatible storage.-
url: endpoint of the S3 compatible storage in theHOST:PORTformat. -
dm: access setting for storing results of distance matrix calculations.bucket: S3 bucket name for the Distance Matrix Async API service.accessKey: access key for accessing the S3 bucket.
-
secretKey: secret key for accessing the S3 bucket. -
vrp: access settings for storing results of VRP calculations.bucket: S3 bucket name.accessKey: access key for accessing the S3 bucket.
-
secretKey: secret key for accessing the S3 bucket.
-
-
naviFront: settings for accessing the Navi-Front service for car and truck routes.url: URL of the Navi-Front service.key: API key for accessing the Navi-Front service.
-
-
Deploy the service with Helm using the created
values-vrp-solver.yamlconfiguration file.helm upgrade --install --version=VERSION --atomic --values ./values-vrp-solver.yaml navi-vrp-solver 2gis-on-premise/navi-vrp-solverIn the
--versionparameter, specify the required API Platform version. For a list of versions, see the API Platform releases section.warningVersions of services within a component must be the same and match the component version.
Install VRP Task Manager (optional)
Installing VRP Task Manager is a prerequisite for using TSP API.
-
Create a Helm configuration file. See here for more details on the available settings.
The example is prefilled with the necessary data collected on previous steps.
values-vrp-task-manager.yamldgctlDockerRegistry: docker.registry.example.com
imagePullSecrets: [onpremise-registry-creds]
resources:
limits:
cpu: 1000m
memory: 2Gi
requests:
cpu: 3000m
memory: 8Gi
kafka:
solver:
groupId: navi_vrp_task_manager
properties:
bootstrap.servers: kafka.example.local:9092
security.protocol: SASL_PLAINTEXT
sasl.mechanism: SCRAM-SHA-512
sasl.plain.username: kafka-async-matrix
sensitiveProperties:
sasl.plain.password: 1Y2u3gGvi6VjNHUt
dm:
groupId: navi_vrp_task_manager
properties:
bootstrap.servers: kafka.example.local:9092
security.protocol: SASL_PLAINTEXT
sasl.mechanism: SCRAM-SHA-512
sasl.plain.username: kafka-async-matrix
sensitiveProperties:
sasl.plain.password: 1Y2u3gGvi6VjNHUt
taskTopic: navi.tsp.task.topic
statusTopic: navi.tsp.status.topic
messageBusTopic: navi.tsp.message.bus.topic
s3:
url: http://navi-async-matrix-s3.storage.example.local:80
publicUrl: http://navi-async-matrix-s3.storage.example.local:80
vrp:
bucket: navi-vrp-bucket
accessKey: TRVR4ESNMDDSIXLB3ISV
secretKey: 6gejRs5fyRGKIFjwkiBDaowadGLtmWs2XjEH18YK
db:
host: navi-vrp-postgresql.storage.example.local
port: 5432
name: onpremise_navi_vrp
user: dbuser_navi_vrp
password: wNgJamrIym8UAcdX
keys:
url: http://keys-service-api/service/v1/keys
token: TSP_TOKEN
dm:
url: http://navi-async-matrix.host
key: key
cities:
linkToCitiesFile: http://castle.svc/cities.confWhere:
-
dgctlDockerRegistry: endpoint of your Docker Registry with the images of the Urbi On-Premise services in theHOST:PORTformat. -
imagePullSecrets: Kubernetes Secrets to access the Docker Registry with the images of the Urbi On-Premise services. -
resources: computational resources settings for the service. To find out recommended resource values, see Computational resources. -
kafka: access settings for the Apache Kafka broker.-
solver: setting for the VRP Task Manager service.-
groupId: group identifier of the VRP Task Manager service. -
properties: parameters for accessing the Kafka server:Kafka server connection optionsThis configuration file example describes the method of accessing the Kafka server using a login and a password. You can also configure SSL authentication or unauthenticated access: see comments on
kafka.propertiessettings on GitHub.bootstrap.servers: URL of the Kafka server.sasl.plain.username: name of the Kafka user.
-
sensitiveProperties.sasl.plain.password: password for the Kafka user.
-
-
dm: settings for the Distance Matrix Async API service.-
groupId: group identifier of the Distance Matrix Async API service. -
properties: parameters for accessing the Kafka server:Kafka server connection optionsThis configuration file example describes the method of accessing the Kafka server using a login and a password. You can also configure SSL authentication or unauthenticated access: see comments on
kafka.propertiessettings on GitHub.bootstrap.servers: URL of the Kafka server.sasl.plain.username: name of the Kafka user.
-
sensitiveProperties.sasl.plain.password: password for the Kafka user.
-
-
taskTopic: name of the topic for sending tasks to VRP Solver. -
statusTopic: name of the topic for getting task solving results from VRP Solver. -
messageBusTopic: name of the topic for communicating with the Distance Matrix Async API service.
-
-
s3: settings for access to the S3 compatible storage.-
url: endpoint of the S3 compatible storage in theHOST:PORTformat. -
publicUrl: proxy URL for accessing the S3 compatible storage. -
vrp: access settings for storing results of VRP calculations.bucket: S3 bucket name.accessKey: access key for accessing the S3 bucket.secretKey: secret key for accessing the S3 bucket.
-
-
db: access settings for the PostgreSQL server.host: host name or IP address of the server.port: listening port of the server.name: database name.userandpassword: credentials for accessing the database specified in thenamesetting. The user must be the owner of this database or a superuser.
-
keys: access settings for the API Keys service.url: URL of the API Keys service endpoint. This URL must be accessible from all the pods within your Kubernetes cluster.token: service token (see Installing API Keys service).
-
dm: access settings for the Distance Matrix Async API service.url: URL of the Distance Matrix Async API service.key: API key to access the service. See the instruction on Managing access to API.
-
cities.linkToCitiesFile: URL to thecities.conffile containing information about cities available to VRP Task Manager.
-
-
Deploy the service with Helm using the created
values-vrp-task-manager.yamlconfiguration file.helm upgrade --install --version=VERSION --atomic --values ./values-vrp-task-manager.yaml navi-vrp-task-manager 2gis-on-premise/navi-vrp-task-managerIn the
--versionparameter, specify the required API Platform version. For a list of versions, see the API Platform releases section.warningVersions of services within a component must be the same and match the component version.
Install Restrictions API service (optional)
Installing Restrictions API is a prerequisite if you plan to use only custom road closure information. Using both the Restrictions API and the provided data will result in incorrect operation. For more information, see the Working with road closures section.
-
Create a Helm configuration file. See here for more details on the available settings.
The example is prefilled with the necessary data collected on previous steps.
values-restrictions.yamldgctlDockerRegistry: docker.registry.example.com
imagePullSecrets: [onpremise-registry-creds]
naviBackHost: 'navi-back-directions-car'
naviCastleHost: 'navi-castle'
postgres:
host: navi-restrictions-postgresql.storage.example.local
port: 5432
name: onpremise_restrictions
user: dbuser_restrictions
password: jwbK65iFrCCcNrkg
api:
key: ''
ingress:
enabled: true
className: nginx
hosts:
- host: navi-restrictions.example.com
paths:
- path: /
pathType: Prefix
tls: []
# - hosts:
# - navi-restrictions.example.com
# secretName: secret.tls
cron:
enabled: true
schedule: '1 * * * *'
concurrencyPolicy: Forbid
successfulJobsHistoryLimit: 3
failedJobsHistory: 3
projects:
- moscow
maxAttributesFetcherRps: 25
customCAs:
bundle: ''
# bundle: |
# -----BEGIN CERTIFICATE-----
# ...
# -----END CERTIFICATE-----
certsPath: ''Where:
-
dgctlDockerRegistry: endpoint of your Docker Registry with the images of the Urbi On-Premise services in theHOST:PORTformat. -
imagePullSecrets: Kubernetes Secrets to access the Docker Registry with the images of the Urbi On-Premise services. -
naviBackHost: host name of any Navi-Back service deployed. -
naviCastleHost: host name of Navi-Castle. -
postgres: access settings for the PostgreSQL server.host: host name or IP address of the PostgreSQL server.port: listening port of the PostgreSQL server.name: database name.userandpassword: credentials for accessing the database specified in thenamesetting. The user must be the owner of this database or a superuser.
-
api: API service settings.key: API key that will be used to interact with Navigation services. The value of this setting must match the value of therestrictions.keysetting of the Navi-Castle service.ingress: configuration of the Ingress resource. Adapt it to your Ingress installation. The URL specified in theingress.hosts.hostparameter should be accessible from the outside of your Kubernetes cluster, so that users in the private network can browse the URL.
-
cron: Kubernetes CronJob settings for obtaining information from navigation services.enabled: flag that controls whether the job is enabled.schedule: schedule of the job in cron format.concurrencyPolicy: job concurrency policy.successfulJobsHistoryLimit: how many completed jobs should be kept.failedJobsHistoryLimit: how many failed jobs should be kept.projects: list of Navi-Back projects (see the Rules file).maxAttributesFetcherRps: maximum number of requests toedgeAttributesUrlTemplateper second.
-
customCAs: custom certificates settings.bundle: text representation of a certificate in the X.509 PEM public-key format.certsPath: bundle mount directory in the container.
-
-
Deploy the service with Helm using the created
values-restrictions.yamlconfiguration file:helm upgrade --install --version=VERSION --atomic --wait-for-jobs --values ./values-restrictions.yaml navi-restrictions 2gis-on-premise/navi-restrictionsIn the
--versionparameter, specify the required API Platform version. For a list of versions, see the API Platform releases section.warningVersions of services within a component must be the same and match the component version.
-
In the Navi-Castle configuration file, edit
castle.restrictionsandcronsettings as follows:castle:
restrictions:
key: secret
url: http://navi-restrictions.example.local
cron:
enabled:
import: true
restriction: true
schedule:
import: '*/10 * * * *'
restriction: '*/10 * * * *'
concurrencyPolicy: Forbid
successfulJobsHistoryLimit: 3
failedJobsHistoryLimit: 3Where:
-
castle: Navi-Castle configuration.restrictions.key: key that will be used to interact with the Restrictions API service. An arbitrary string.restrictions.url: URL of the Restrictions API service. This URL should be accessible from all the pods within your Kubernetes cluster.
-
cron: Kubernetes CronJob settings for data import. Cron job fetches actual data from the Installation Artifacts Storage and updates the data on the Navi-Castle replica. These settings are the same for all replicas of the Navi-Castle service.enabled.import,enabled.restriction: flags that control whether the jobs for data import of road closures from the Restrictions API service are enabled. If the jobs are disabled, none of the Navi-Castle replicas will receive data updates.schedule.import,schedule.restriction: schedules of the jobs in cron format.
-
-
Update the Navi-Castle service using the edited
values-castle.yamlconfiguration file:helm upgrade --install --version=VERSION --atomic --values ./values-castle.yaml navi-castle 2gis-on-premise/navi-castleIn the
--versionparameter, specify the same API Platform version as during the previous command execution.
8.5. Test deployment
Test Navi-Castle service
To test that the Navi-Castle service is working:
-
Port forward the service using
kubectl:kubectl port-forward navi-castle-0 7777:8080 -
Send a GET request to the root endpoint (
/) using cURL or a similar tool:curl -Lv 'http://localhost:7777/'You should receive an HTML listing of all files and folders similar to the following:
<html>
    <head>
        <title>Index of /</title>
    </head>
    <body>
        <h1>Index of /</h1>
        <hr />
        <pre>
            <a href="../">../</a>
            <a href="lost%2Bfound/">lost+found/</a>          09-Mar-2022 13:33        -
            <a href="packages/">packages/</a>                09-Mar-2022 13:33        -
            <a href="index.json">index.json</a>              09-Mar-2022 13:33      634
            <a href="index.json.zip">index.json.zip</a>      09-Mar-2022 13:33      357
        </pre>
        <hr />
    </body>
</html>
Test Navi-Back service
To test that the Navi-Back instance is working:
-
Port forward the service using
kubectl:kubectl port-forward service/navi-back-<service> 7777:8080Where
navi-back-<service>is the instance name that you specified during Navi-Back installation (for example,navi-back-directions-car). -
Create the
data.jsonfile containing the body of a navigation API request. You can find request examples in the documentation for navigation services:- Routing API: routes for public transport, cars, taxi, bicycles, scooters, motorcycles, emergency services, trucks, and pedestrians.
- Directions API: routes for cars, taxi, bicycles, scooters, motorcycles, emergency services, and pedestrians (to be used by mobile SDK).
- Isochrone API: areas reachable by car.
- Distance Matrix API: distance matrices.
Testing of the Distance Matrix Async API is described below.
The example below contains a request to Directions API for building a car route (the example is valid for Moscow):
data.json{
"alternative": 1,
"locale": "en",
"point_a_name": "start",
"point_b_name": "finish",
"type": "jam",
"points": [
{
"start": true,
"type": "walking",
"x": 37.616489,
"y": 55.751225
},
{
"start": false,
"type": "walking",
"x": 37.418451,
"y": 55.68355
}
]
} -
Send the request using cURL or a similar tool (example for Directions API):
curl -Lv 'http://127.0.0.1:7777/carrouting/6.0.0/global' -d @data.jsonYou should receive a response with the following structure (example for Directions API):
{
  "query": {..},
  "result": [{..}, {..}]
  "type": "result"
}
You can find response examples for other services in their documentation.
Test Navi-Splitter service
To test that the Navi-Splitter service is working:
-
Create the
data.jsonfile containing the body of a request to Distance Matrix API. Example:{
"points": [
{
"lon": 37.5833,
"lat": 55.7404
},
{
"lon": 37.5803,
"lat": 55.7696
},
{
"lon": 37.6539,
"lat": 55.7692
},
{
"lon": 37.6546,
"lat": 55.7415
}
],
"sources": [0, 1],
"targets": [2, 3]
} -
Send the request using cURL or a similar tool:
curl -Lv 'http://127.0.0.1:7777/get_dist_matrix' -d @data.jsonYou should receive a response with the following structure:
{
    "generation_time": 1111,
    "routes":  [{..}, {..}]
}
Test Navi-Router service
To test that the Navi-Router service is working:
-
Generate an API key using the API Keys service. For more information, see Keys and tokens.
-
Port forward the service using
kubectl:kubectl port-forward navi-router-6864944c7-vrpns 7777:8080 -
Create a
data.jsonfile containing the body of a service request, identical to the file from Testing the deployment of Navi-Back. -
Send the request using cURL or a similar tool (example for Directions API):
curl -Lv 'http://127.0.0.1:7777/carrouting/6.0.0/global?key=API_KEY' -d @data.jsonWhere
API_KEYis your API key to access navigation services.You should receive a response containing the rule name:
directions-car
Test Navi-Front service
To test that the Navi-Front service is working:
-
Generate an API key using the API Keys service. For more information, see Keys and tokens.
-
Create a
data.jsonfile containing the body of a service request, identical to the file from Testing the deployment of Navi-Back. -
Send the request using cURL or a similar tool (example for Directions API):
curl -Lv 'http://navi-front.example.com/carrouting/6.0.0/global?key=API_KEY' -d @data.jsonWhere
API_KEYis your API key to access navigation services.You should receive a response with the following structure:
{
  "query": {..},
  "result": [{..}, {..}]
  "type": "result"
}
Test Distance Matrix Async API service
To test that the Distance Matrix Async API service is working:
-
Generate an API key using the API Keys service. For more information, see Keys and tokens.
-
Create a
data.jsonfile containing the body of the request (the example is valid for Moscow):{
"points": [
{
"lon": 37.573289,
"lat": 55.699926
},
{
"lon": 37.614402,
"lat": 55.706847
},
{
"lon": 37.552182,
"lat": 55.675928
},
{
"lon": 37.620315,
"lat": 55.669625
}
],
"sources": [0, 1],
"targets": [2, 3]
} -
Send the request using cURL or a similar tool:
curl -Lv 'https://navi-async-matrix.example.com/create_task/get_dist_matrix?key=API_KEY' --header 'Content-Type: application/json' -d @data.jsonWhere
API_KEYis your API key to access navigation services.You should receive a response with the following structure:
{
    "task_id": "{TASK_ID}",
    "message": "success add task",
    "status": "success"
} -
Request the task status using the
TASK_IDparameter received on the previous step:curl -Lv 'https://navi-async-matrix.example.com/result/get_dist_matrix/{TASK_ID}'Perform the request multiple times if necessary, while the task is running. Eventually, you should receive a response with the following structure:
{
    "task_id": "{TASK_ID}",
    "status": "TASK_DONE",
    "code": 200,
    "message": "1670066296399691644\ncalc_time_ms=485\nattract_time=21\nbuild_time=58\npoints_count=4\nsource_count=2\ntarget_count=2",
    "result_link": "http://artifacts.example.com/navi-async-matrix/{TASK_ID}.response.json"
} -
Download the calculation results using the URL received in the
result_linkfield on the previous step. Make sure that the result is a valid JSON file. Example:{
"generation_time": 94.0,
"routes": [
{
"status": "OK",
"source_id": 0,
"target_id": 2,
"distance": 7996,
"duration": 728,
"reliability": 1.0
},
...
],
"attract_time": 21.0,
"build_matrix_time": 58.0
}
Test Restrictions API service
To test that the Restrictions API service is working:
-
Create a
data.jsonfile containing the body of the request (the example is valid for Moscow):{
"start_time": "2022-07-03T20:30:00.000Z",
"end_time": "2029-08-28T23:59:00.000Z",
"lat": 55.75291,
"lon": 37.6113,
"is_whole_road": false
} -
Send the request using cURL or a similar tool:
curl -Lv 'http://navi-restrictions:7777/points/' --header 'Content-Type: application/json' -d @data.jsonYou should receive a response with the following structure:
[
    {
        "edge_geometry": "LINESTRING(37.610827 55.752269, 37.610958 55.752424, 37.611215 55.752690, 37.611287 55.752790, 37.611356
        55.752894, 37.611798 55.753816)",
        "restriction_id": "{RESTRICTION_ID}",
        "start_time": "2022-07-05T14:13:35.936000+00:00",
        "end_time": "2029-08-28T23:59:00+00:00",
        "is_2gis": false
    }
] -
Verify that the road closure has appeared in the system:
curl -Lv 'http://navi-restrictions:7777/restrictions/' -
Remove the closure:
curl --request DELETE 'http://navi-restrictions:7777/restrictions/{RESTRICTION_ID}'Where
{RESTRICTION_ID}is the value of therestriction_idfield from the request response obtained on step 2.
9. Installing Platform Manager
9.1. Before installing
-
Consider getting familiar with:
-
Make sure the preparation steps are completed:
-
Collect data specified or retrieved on previous steps:
Object Example value How to get value Endpoint of the Docker Registry for storing service images docker.registry.example.comSee Fetching installation artifacts MapGL JS API endpoint http://mapgl-js-apiSee Installing maps API Catalog APIs endpoint http://catalog-apiSee Installing search API Navigation API endpoint http://navi-frontSee Installing navigation API API keys MAPGL_KEYCATALOG_KEYNAVI_KEYSTATIC_KEYSee Installing API Keys service -
Make sure that the resource requirements specified in the Helm chart are met.
For more information on how to do this, see the System requirements document.
Refer to a relevant chartContents of the Helm chart described in this chapter are relevant for the latest API Platform version (see API Platform releases). To find parameters for previous versions, open values.yaml on GitHub and select a
Platform-<version>tag in the tag switcher on the left. -
Choose the domain name for the service. For example,
platform.example.com.
9.2. Install Platform Manager
-
Create a Helm configuration file. See here for more details on the available settings.
The example is prefilled with the necessary data collected on previous steps.
values-platform.yamldgctlDockerRegistry: docker.registry.example.com
imagePullSecrets: [onpremise-registry-creds]
ui:
playgrounds: mapgl,geocoder,directions,static
brand: 2gis
pages: "profile,signup,status,playground,map_styles,users,keys,statistics,license"
oauth:
wellknownUrl: https://keycloak.example.com/realms/platform/.well-known/openid-configuration
clientId: platform
clientSecret: secret
scope: ''
codeUrl: https://platform.ingress.host/api/auth/code
safeHosts: '.*'
secure: true
status:
mapgl: "MapGL JS=http://mapgl-js-api,Tiles API=http://tiles-api/healthcheck"
search: "Catalog API=http://catalog-api,Search API=http://search-api/v2/status"
navi: "Castle=http://navi-castle/cities.conf,Back=http://navi-back-directions-car/about,Routing=http://navi-front/healthcheck"
pro: "PRO UI=http://pro-ui:3000/api/healthcheck/app,PRO API=http://pro-api/health/live,PRO Permissions API=http://pro-api-permissions"
keys: "Keys UI=http://keys-admin,Keys Service API=http://keys-service-api/healthcheck,Keys API=http://keys-api/healthcheck"
mapStyles: "http://styles-api/healthcheck"
platform:
api:
url: 'https://keys-api.example.com'
license:
url: 'http://license.example.com'
mapgl:
url: 'https://mapgl-js-api.example.com'
scriptPath: /api.js
key: 'MAPGL_KEY'
initCenter: ''
mapStyles:
url: 'https://styles.example.com'
key: 'STYLES_KEY'
catalog:
url: 'https://catalog.example.com'
key: 'CATALOG_KEY'
navi:
url: 'https://navi.example.com'
key: 'NAVI_KEY'
static:
url: 'https://staticmaps.example.com'
key: 'STATIC_KEY'
resources:
requests:
cpu: 300m
memory: 384Mi
limits:
cpu: 1100m
memory: 512Mi
ingress:
enabled: true
className: nginx
hosts:
- host: platform.example.com
paths:
- path: /
pathType: Prefix
tls: []
# - hosts:
# - platform.example.com
# secretName: secret.tlsWhere:
-
dgctlDockerRegistry: endpoint of your Docker Registry with the images of the Urbi On-Premise services in theHOST:PORTformat. -
imagePullSecrets: Kubernetes Secrets to access the Docker Registry with the images of the Urbi On-Premise services. -
ui: common application settings:-
playgrounds: list of available playgrounds in the application. Possible values:mapgl(you additionally need to specify theui.mapgl.urlparameter),geocoder(you additionally need to specify theui.catalog.urlparameter),directions(you additionally need to specify theui.navi.urlparameter),static(you additionally need to specify theui.static.urlparameter). Values are separated by commas and written in one string and without spaces, for example:'mapgl,geocoder'. -
brand: branding inside the application. Possible values:2gis,urbi. -
pages: list of available pages in the application. Values are separated by commas and written in one string and without spaces, for example:'status,playground'. First value in the list is the default page. Minimum required values aremap_styles(if you install Styles API),status, andplayground. See here for the list of all possible values. -
oauth: OIDC provider integration settings. Required for user authentication and for API key statistics to work.wellknownUrl: URL of the OIDC configuration.clientId: OIDC client identifier.clientSecret: OIDC client secret used to exchange the authorization code for a token.scope: OIDC scopes.codeUrl: URL used to exchange the authorization code for a token. Built from the actual application host:https://<host>/api/auth/code.safeHosts: regular expression used to validate the host to which the redirect is performed after the token exchange.secure: whether HTTPS is used for authentication tokens.
-
status: list of statuses of On-Premise services.Each entry is a string containing pairs of the service name and its healthcheck URL. Pairs are separated by commas. Values inside a pair are joined by the "
=" symbol. For example,mapgl: 'MapGL JS=https://example.com/healthcheck'. URL must be absolute. You can specify only the URL, for example:mapgl: 'https://example.com/healthcheck'.mapgl: status of the MapGL JS API service.search: status of the Search services.navi: status of the Navigation services.pro: status of Urbi Pro.keys: status of the API Keys service.mapStyles: status of the Styles API service.
-
platform: access settings for the API Keys service:api.url: address of the service host in theHTTP(S)://HOSTformat.
-
license: access settings for the License service:url: address of the service host in theHTTP://HOSTformat.
-
mapgl: access settings for the MapGL JS API service:url: address of the service host in theHTTP(S)://HOSTformat.scriptPath: path to the service initialization script. The path is built relatively toui.mapgl.url. Possible values:/api.js.key: access key for the service.initCenter: default map coordinates presented as two numbers in an array:[lng, lat]. For example:[55.27, 25.2]for Dubai,[37.64, 55.74]for Moscow.
-
mapStyles: access settings for the Styles API service:url: address of the service host in theHTTP(S)://HOSTformat.key: access key for accessing map styles import.
-
catalog: access settings for the Catalog APIs service:url: address of the service host in theHTTP(S)://HOSTformat.key: access key for the service.
-
navi: access settings for the navigation API service:url: address of the service host in theHTTP(S)://HOSTformat.key: access key for the service.
-
static: access settings for the Static API service:url: address of the service host in theHTTP(S)://HOSTformat.key: access key for the service.
-
resources: computational resources settings for the service. To find out recommended resource values, see Computational resources. -
ingress: configuration of the Ingress resource. Adapt it to your Ingress installation. The URL specified in theingress.hosts.hostparameter should be accessible from the outside of your Kubernetes cluster, so that users in the private network can browse the URL.
-
-
-
Deploy the service with Helm using the created
values-platform.yamlconfiguration file:helm upgrade --install --version=VERSION --atomic --values ./values-platform.yaml platform 2gis-on-premise/platformIn the
--versionparameter, specify the required API Platform version. For a list of versions, see the API Platform releases section.warningVersions of services within a component must be the same and match the component version.
9.3. Test deployment
To test that the Platform Manager is working, go to https://platform.example.com in a browser. The web interface should be opened.
In the Platform Manager, you can check the status of installed services, upload custom styles, and test key APIs: for more details, see the Working with the Platform Manager instruction.
9.4. Set up user authentication
To work with the Platform Manager, end users must pass the authentication. The On-Premise software suite does not provide an authentication service to be installed in a private environment. Therefore, you need to use your own OpenID Connect (OIDC) provider to authorize users via Single Sign-On (SSO) technology.
Only users registered in the external OIDC provider database can authenticate and be authorized in the Platform Manager. User management is also handled on the provider side.
Configure your OIDC provider by meeting the following requirements:
-
Define the mandatory claims. The following user data must always be filled in the
user-inforesponse:sub- user identifier.email- user email.email_verified- flag indicating if the email is verified by the user.name- user full name.phone_number- user phone number.
-
Configure the scopes that can be used to request the defined claims. The standard set of scopes includes the following values:
openid- mandatory parameter indicating that OIDC is used for user authentication.email- user email.profile- link to the user profile.phone- user phone number.
-
Create a client in your OIDC provider:
-
Configure the client ID (
client_id) and secret (client_secret). -
Specify the Callback URL and the Logout URL for the service:
- Callback URL:
https://{application_host}/api/auth/code - Logout URL:
https://{application_host}/api/auth/post_sign_out
- Callback URL:
-
Configure the client to work with previously defined scopes.
-
10. Installing mobile SDK
The mobile SDK for iOS, Android, and Flutter only up to and including version 13.4.0 is available for use in a private network.
10.1. Before installing
-
Consider getting familiar with:
-
Contact the On-Premise support service to get the necessary assets:
-
File with a key to enable SDK usage. When contacting support, specify the following:
- Key must be configured to be used in the On-Premise mode.
- Key App ID must be equal to the
applicationId/bundleIdof the map where the mobile SDK is connected.
You can also request enabling wildcard in the key to use a cascaded App ID. For example, if wildcard in enabled in the key and the App ID is set to
com.geo.app, this key enables using mobile SDK in applications whoseapplicationId/bundleIdare equal tocom.geo.app.testing,com.geo.app.staging,com.geo.app.dev, and more. -
vendor-config.jsonxconfiguration file with On-Premise services preset.This file contains service URLs and the key identifier from the API Keys service in the
dgis/native-sdk/keys/user_web_api_key_for_on_premisefield. Service users can set this identifier by themselves based on keys from the API Keys service.
-
10.2. Install mobile SDK
-
Install the mobile SDK by following the instructions:
- for Android platforms
- for iOS platforms
-
When initializing SDK in your application, connect
vendor-config.jsonxby following the instructions:- for Android platforms
- for iOS platforms